
by Nina
When most people think of building upper body strength with yoga, they tend to imagine they need to do challenging arm balances. But I’m here to tell you that you don’t have to do Handstand or Crow pose to build upper body strength! That’s because every yoga pose where you put body weight on your hands builds upper body strength, including Cat-Cow pose, Downward-Facing Dog pose, Upward-Facing Dog pose, Plank pose, Side Plank pose, and Upward Plank pose.
Also, any pose where you hold your arms up overhead or out to the side builds upper body strength, including Arms Overhead pose, Powerful pose, Warrior 1, Warrior 2, and Warrior 3, Tree pose, Triangle pose, Extended Side Angle pose, Half Moon pose, and so on. Do you doubt me? Try keeping your arms in position instead of releasing them as you change from the first side to the second side of Warrior 2 (or any other pose). I bet you’ll find it’s harder than you expected.
Finally, simple backbends, such as Locust pose and Bow pose, where you lift your upper body and arms away from gravity, also build upper body strength.
So you can see there are actually many simple, accessible yoga poses that you can practice to cultivate upper body strength. And many if not all of these poses have variations you can use to make them even more accessible, whether for yourself or for your students.
I myself work regularly on maintaining my upper body strength by doing some simple, accessible yoga poses. Here are some of my favorites arranged in a short sequence. All of them have options to make them more accessible.
Mini Upper Body Strengthening Practice
To build strength in the static poses (held poses), you can hold them until you feel your muscles tiring and gradually build up to longer holds over time. If 30 seconds isn’t possible, just stop when you’re ready and gradually build up endurance in the pose. To build strength in dynamic poses (poses where you move in and out of the pose with your breath), you can gradually increase the number of repetitions. See Techniques for Strength Building for more tips about building strength in general, including how often to do the poses.
If you want to add resting poses between the more challenging ones, please do!
1. Cat-Cow Pose (Cakravakasana), 6 rounds.
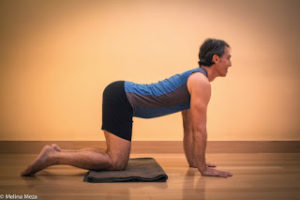
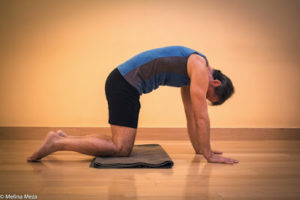
In this pose, you’re supporting part of your body weight on your hands as you move between Cat and Cow poses with your breath. And it’s a great way to warm up for the other poses in the sequence. For those with wrist problems or if you want to see some variations, go to Featured Pose: Cat-Cow pose.
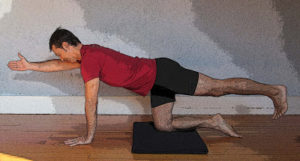
2. Hunting Dog pose, 30 seconds to 1 minute per side.In this pose, you take more of your body weight onto one hand, which increases the strength building on that side and holding the other arm forward builds upper body strength in your torso. You’re also strengthening your lower body when you lift your back leg. If you find balancing in this pose is too challenging for you to hold the pose for a good length of time, you can leave both knees on the ground and just lift one arm at a time. See Strengthening Pose of the Week: Hunting Dog Pose for more information and variations.
3. Half Dog at the Wall, 30 seconds to 2 minutes.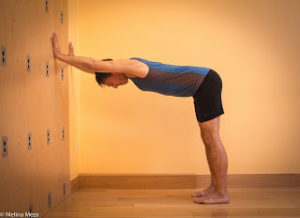 Although this pose is in the sequence mainly to help you warm up for Downward-Facing Dog pose, taking your arms “overhead” in this pose and actively pressing your hands or fingertips into the wall will help strengthen your upper body. See Featured Pose: Half-Downward Facing Dog Pose for more information and variations.
4. Downward-Facing Dog (Adho Mukha Svanasana) pose, 30 seconds to 2 minutes.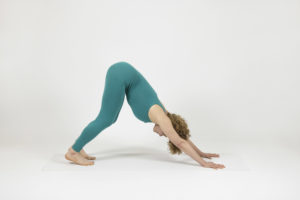 This is the pose that B.K.S. Iyengar recommends for building up upper body strength! As you might have noticed, in this pose you are bearing much of your body weight on your hands. If your legs are tight, you can practice with bent knees as shown above. People with wrist problems can do this on the forearms. See Strengthening Pose of the Week: Downward-Facing Dog pose for more information and variations.
5. Standing Forward Bend (Uttanasana), 30 seconds to 1 minute. I’m including this pose in the sequence so you can rest from practicing Downward-Facing Dog pose before moving on the Plank pose. So allow this pose to be a release for your upper body muscles. If your legs are tight and the pose is a strain, you can practice with bent knees. See Featured Pose: Standing Forward Bend for more information and variations.
6. Downward-Facing Dog pose to Plank Pose or Plank Pose Vinyasa.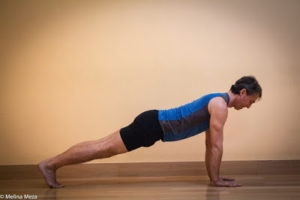
Come back into Downward-Facing Dog pose and from there, on your inhalation, move into Plank pose. If you have wrist problems, you can practice both Downward-Facing Dog and Plank on your forearms or use other variations of Plank. See Strengthening Pose of the Week: Plank Pose for more information and for variations.
You could either hold Plank pose for 30 seconds to 2 minutes and then move back into Downward-Facing Dog pose before coming out. Or, you could do the two poses dynamically, moving into Plank on your inhalation and moving into Downward-Facing Dog on your exhalation. I often do the vinyasa because it releases stiffness in my shoulders while also building strength.
7. Sideways Plank Pose (Vasithsasana), 30 seconds to 1 minute per side.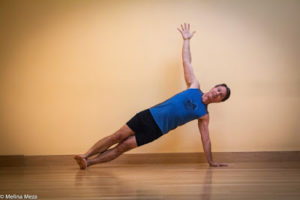 In this pose much of your body weight is on one hand but you’re also lifting the side of your body away from gravity so it is strengthening different muscles at the side of your body as well as arm and shoulder muscles. People with wrist problems can practice with the forearm on the floor. People who have trouble balancing on one hand can use a different foot position so you’re not balancing on the edge of your feet. People who want to build up the strength to do the classic pose can try some of the great variations Bridget has come up with in her post or can do the wall version. See Strengthening Pose of the Week: Side Plank pose for more information and variations.
8. Upward Plank Pose (Purvottanasana), 30 seconds to 1 minute.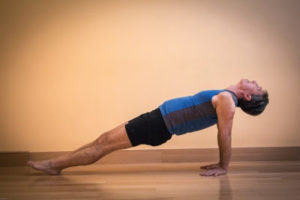 In this pose much of your body weight is on your hands but you’re also lifting the back of your body away from gravity so the pose is strengthening back muscles as well as arm and shoulder muscles. People with wrist problems can try the chair version, where you bear less weight on your hands. If you like, you can repeat this pose more than once, resting on your back with knees bent, in between. See Strengthening Pose of the Week: Upward Plank Pose for more information and variations.
9. Child’s Pose (Balasana), 1 to 2 minutes. 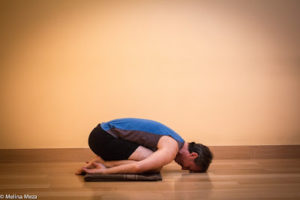 Now it’s time to relax your upper body! You can practice any form of Child’s pose you like, whether a classic version or restorative version. See Featured Pose: Child’s Pose and Featured Pose: Supported Child’s pose for information and variations. Just make sure your arms are relaxing and releasing, not actively stretching forward.
10. Optional Savasana.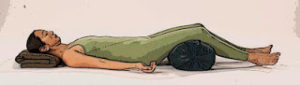 As you practice any form of Savasana you like, focus on relaxing and releasing your hands, arms, and upper body.
• Follow Yoga for Healthy Aging on Facebook and follow Nina on Instagram •Pre-order Yoga for Times of Change: Practices and Meditations for Moving Through Stress, Anxiety, Grief & Life’s Transitions here. • Order Yoga for Healthy Aging: A Guide to Lifelong Well-Being here
Leave A Comment