
by Bridget
Side Plank pose (Vasisthasana) is a good strengthening pose for so many reasons. As I’ve mentioned in recent weeks, improving core strength requires strengthening from all sides of your core, front, back and sides. Because Side Plank recruits the oblique abdominal muscles to help stabilize your hips, it strengthens the sides of your core. And because spinal stabilization is required to keep the alignment in this pose, Side Plank also strengthens your spinal muscles.This pose has even been prescribed for people with scoliosis to strengthen the convex side of their curve, resulting in a reduction of the curve overall. See How to Practice Side Plank Pose for Scoliosis for more information on this.
Additionally, having weight on your arm engages all of your shoulder stabilizer muscles to keep the head of your upper arm bone centered in the socket. Your gluteus medius and maximus (side and back hip muscles, otherwise known as your buttocks) also need to fire here, adding to the completeness of this pose for creating whole-body strength and stability.
Like Plank pose, Side Plank doesn’t flex or extend the spine, making it safer for people with back or disc injuries than many other core strengtheners. And there are so many variations of Side Plank that make it more accessible that it’s tough to find a reason not to jump in and start!
Variations of Side Plank Pose
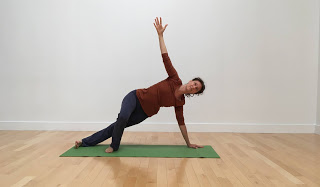
1. Kickstand Support for Hips
Side Plank is an intense pose that requires quite a lot of
strength to do correctly. Going directly into the pose when you don’t have the
strength or experience to get the alignment right could lead to injury. For
this reason, I recommend coming into the pose one step at a time, and maybe
even working with this version for a while before attempting another version.
To come into the Kickstand version, begin in Downward-Facing Dog pose. From there, glide forward into Plank pose to find the length of your body and lift your ribcage away from your arms. Then step one foot forward, in line with your other knee (this is not a lunge position), and swivel toward that forward foot.
Once you swivel open, your back foot (the extended leg) should be on its pinky toe side, and your front foot (bent knee) comes flat onto the floor, like you could stand on it. Press the front foot into the floor and it will take some of the weight of your hips off of your arm and give you a chance to rest into your back body and to lengthen from your head to your back heel. If this feels easy, you could extend your front leg to meet the other leg. 2. Shin on the Floor |

This version is even gentler than the Kickstand version. With your hips completely supported by your shin, you can really take your time exploring your body positioning. To come into this pose, start on hands and knees. Walk your hands slightly forward of your shoulders. Extend one leg behind you, keeping your toes tucked under on the floor, then drop the arch of your foot (the big toe side) to the floor, with your heel dropping toward your other foot. From there you can bring the same arm as extended leg to your hip, and, once sure of your balance, extend your top arm. Press your hand into the floor and lift your ribcage away from that arm, up toward the other arm, and take some of the weight into your back foot. This is where you could play with letting weight on your shin get lighter, testing the strength of your pose. If that’s easy, lift your shin off the floor, and possibly extend the knee and place your bottom leg in front or behind your other leg.
3. Forearm Version
If have a hand or wrist injury, this version allows you to practice without as much weight on your hand and wrist. You can use this forearm version with all of the variations of Side Plank poses shown here. To come into the pose, start from a Downward-Facing Dog pose on your forearms rather than the classic version of Downward Dog.
You can also practice this Forearm Version with your knees bent. Start with your hip on the floor and your knees aligned with your hips and shoulders, feet back behind you. Press your lower leg into the floor to lift your hips. (You can even do reps here to build strength.) This version can be a step between the Shin on the Floor version above and the extended legs version that is discussed in the previous paragraph.
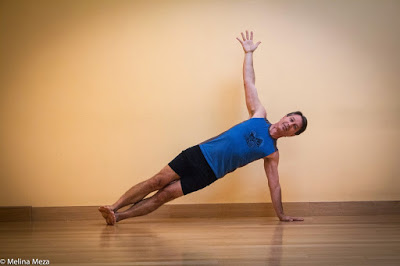
4. Separated Feet
If you’re feeling strong enough to come into the full pose with
integrity, but are struggling with balance, placing your top foot slightly forward of your bottom foot as shown in the photo above offers a little more support with balance. See “Working in the Classic Pose or with Separated Feet” below for instructions.
5. Wall Versions
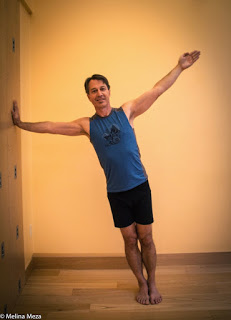
Using the wall instead of the floor allows you to gradually build the strength needed to practice the floor version and can provide even more room for exploring your alignment in this pose.
Start with your side to the wall and place your flat palm onto
the wall, a little lower than the height of your shoulder. Then, step your feet away from
the wall until your inner foot lines up with your outer shoulder. Your outer
foot will have very little, if any, weight on it now, so stand on your inner leg
and find your shoulder alignment. This is the easier version of Wall Side Plank.
If you’re ready to put more weight onto your arm, you can bring your outer foot to
the inner thigh of your standing leg, as you would in Tree pose. Your outer arm
can then reach overhead, palm facing the wall.
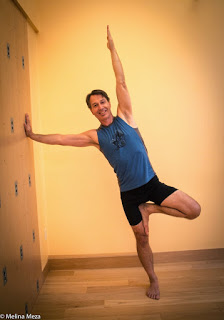
In this pose, I like to think about pressing my inner hand into the wall, spreading my collarbones and ribcage away from that arm, and letting the energy circle through my chest and out through the fingers of my raised arm. Keep your neck soft as you work with your arms and shoulders.
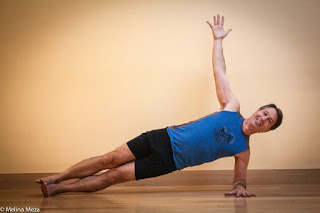
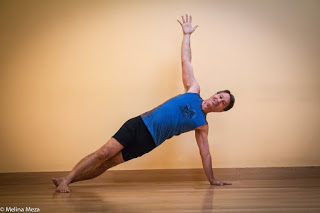
Working in the Classic Pose or with Separated Feet
To practice the classic Side Plank pose or the version with separated feet, start in Downward-Facing Dog pose. Lift into your back body as you glide forward into Plank pose. Find the balance of your long body and lift your ribcage away from your shoulders before you turn onto the outer edge of one of your feet and the rest of your body away from that foot, stacking the other leg on top of the base leg for the classic pose or placing your top foot slightly forward of your bottom foot for the separated feet version.
Your top arm can extend toward the ceiling in line with your other arm and your collarbones. I like to imagine that there’s a wall behind me and send my weight back into my back body, as if I were leaning on that wall. It helps me to align with my spine, which makes extending the pose from head to heel easier. The longer your body, the lighter the pose will feel.
Nina says more about timing and repetitions in her post Techniques for Strength Building with Yoga if you want to read more on this topic.
Find information on Bridget’s current classes here.
Follow Yoga for Healthy Aging on Facebook ° To order Yoga for Healthy Aging: A Guide to Lifelong Well-Being, go to Amazon, Shambhala, Indie Bound or your local bookstore.
Leave A Comment