
by Bridget
Hunting Dog pose is an excellent pose for working on both core and limb strength, as well as on coordination and balance. At first glance, this pose seems simple and not super challenging, but when you dial in to your posture here, it can be a game changer. It works the front and back core muscles, and may even promote balance between the two lobes of your brain, working opposite sides of the body simultaneously. Hip and shoulder strength come into play, and physical balance is challenged, leading to good practice in agility. This is a safe way to practice balance work, as the floor isn’t far away and it’s easy to catch yourself if you lose your balance.
There are several variations that make the pose more accessible. I’m going to take a look at the classic pose first, then break it down so you can leave out any part of it that isn’t working for you.
Variations of Hunting Dog Pose
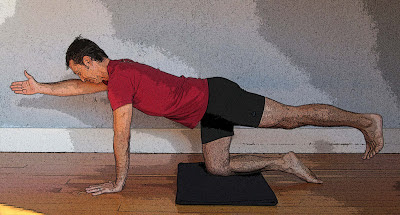
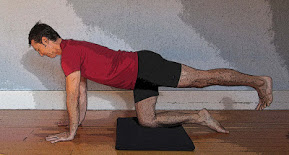
1. Classic Version
The classic version of the pose is more challenging than it looks, especially if you’re dealing with an injury. If this is the case for you, try one of the variations below first. And if kneeling is out of the question, try the Standing Version shown at the end.
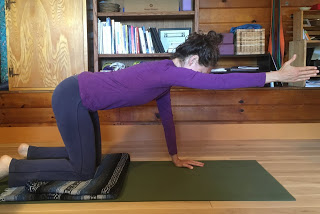
To come into the classic pose as well as all the kneeling variations, start in a hands and knees position with a blanket or other padding under your knees.
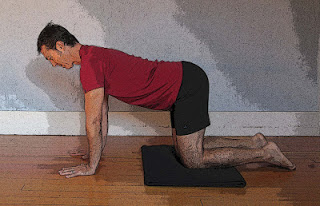
When you’re on your hands and knees, it’s easy to rest into the support of your arms and legs, but instead try engaging your arms and legs by squeezing the muscles in toward the bones and imagining that you’re boring your arms and knees deep into the floor. Then try to lift your trunk, as a unit, off the support of your arms and legs. This already does some work to strengthen your arms, legs, and core. From here, gather your belly organs in and press them toward your spine. Be sure when you lift your trunk, that you’re not arching up into Cat pose, just lifting away from the floor. Finally, lengthen your spine, reaching top of your head and your tailbone in opposite directions.
Maintaining all of the attention from the hands and knees position, slide one foot back, keeping your toes on the floor, and minimizing the amount of movement in the pelvis.
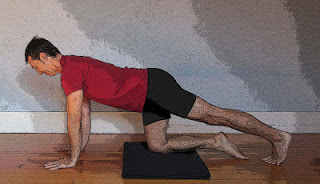
Next, lift your leg, taking the foot a maximum of 8-10 inches off the floor. The goal is not to lift the leg high here, it’s to feel your buttocks muscles engage while maintaining the length in your core. Your leg should not be higher than the height of your pelvis.
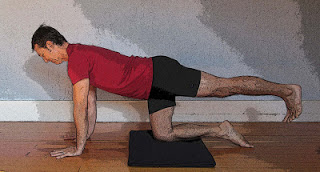
If this is enough for you, you can practice this way without lifting your arm (see Legs Only version below). Or you can practice just with lifting your arm (see Arms Only version below). But if you’re ready to practice with both arms and legs, extend the opposite arm from your lifted leg, lifting it to about shoulder height.
Notice whether you sank onto the other shoulder and, if so, see if you can lift off of it again. Keep your head lifted in line with your arm, but don’t let your belly drop here. You want a straight line between your forward reaching fingers and your extended leg heel.
2. Legs Only Version

You can do the classic pose as described above with just the leg lifted instead of both the leg and the arm. This version would be a good place to spend some time if you are experiencing low back pain, as continuing into further versions might aggravate the issue. Start with your toes on the floor, then only lift as high as you can while maintaining your lifted posture. If you find this version challenging, this is where you should practice, aiming to maintain good posture with one leg back. Make sure to try it on both sides – it’s also possible that the two sides will feel different.
3. Arms Only Version
You can do the classic pose as described above with just the arm lifted instead of both the leg and the arm.This is a good option if you’re dealing with low back pain. It works the shoulder and mid-back, offering some stability and strengthening, without aggravating the lower back muscles needed to lift the leg.
4. Standing Version
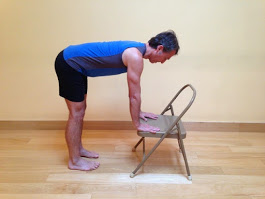
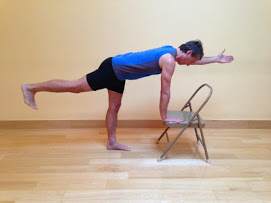
The standing variation can be helpful if putting pressure on your knees isn’t comfortable or just not possible. This variation can also be helpful for anyone dealing with wrist discomfort, as it takes some of the weight off of the hands, but also because you can turn your hands to the sides and let your fingers drape over the side of the chair, lessening the angle and the strain on your wrist.
One concern here is that this pose lifts your body back to standing, making the balancing a little less safe. If balance is not your strong suit, you might slide your chair over to a wall, so that the side of the chair is pressed up against the wall. This way, when you come into the pose, you have the wall beside you to support a sideways tip, if it occurs.
Working in the Poses
This is an especially good pose to practice if you’re dealing with back pain. It’s a more accessible way to strengthen your back muscles than Locust pose (Salabasana), which has you lying on your front body. Starting with the hands and knees position, you can decide how much you extend your leg back and how much you lift it, giving you a little more control over the work. Additionally, the arm action works the shoulders and mid-back, offering some stability and strengthening, while the leg work gets into the hips and lower back muscles. In my extensive personal experience with back pain, strengthening nearby muscles can help take the pressure off the painful spot. And stabilizing your back (without aggravating it) is a great step in the direction of easing chronic pain.
In all the versions, once you have your limb or limbs extended, see if you can find the sensation of being lifted as a unit up toward the ceiling—all the way from your front fingertips, through your arm, into your shoulder, your entire torso, and down the length of your leg. Then find more length in your spine and out through both your arm and your leg. When you feel as if you can’t get any more lifted/lengthened or stable in the pose, soften your neck and take a few long, slow breaths here before you gently lower down to take the other side.
Once you find your most lifted position, be sure to stay there for at least a few breaths, but you could also hold until you start to feel fatigued. As soon as you feel some aspect of the pose drooping and you can’t get it to lift back up, come down.
Nina says more about timing and repetitions in her post Techniques for Strength Building with Yoga if you want to read more on this topic.
Find information on Bridget’s current classes here.
Follow Yoga for Healthy Aging on Facebook ° To order Yoga for Healthy Aging: A Guide to Lifelong Well-Being, go to Amazon, Shambhala, Indie Bound or your local bookstore.
Leave A Comment