
by Bridget
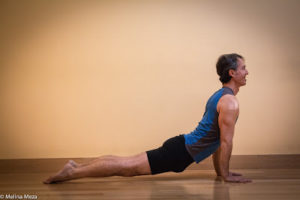
Upward-Facing Dog pose (Urdhva Mukha Svanasana) is a major full-body strengthening pose. With weight on your hands, wrists, arms, and shoulders, you engage your upper body fully while your legs fire to keep the weight in the tops of your feet. Lifting into a backbend against gravity strengthens all the muscles along your back body, but your front body (abdominals and quads) keep the backbend balanced.
In some forms of yoga, Upward-Facing Dog pose is a repeated pass-through pose in vinyasas, and can be overlooked for both its benefits and its potential pitfalls. The main pitfall I want to cover today is taking the whole bend into the low back. It’s a common misperception that you practice Upward-Facing Dog entirely with your back body. Instead, it is important to keep your front body onboard instead of letting it go slack while you engage your back body. In my mind, I see it as the difference between being held up by a taut tightrope or slackline (the slackline being your front body engagement), rather than dropping into a flimsy net. I will discuss this further under “Working in the Poses” below.
Although the classic pose shown above can look quite easy, it’s actually more challenging than it seems. So it’s best for beginners and for those who want to slow down and explore the pose one step at a time to start with a variation of Upward-Facing Dog pose that is a little more accessible, and gradually work your way toward the classic pose. I’ll list some options below.
Variations of Upward-Facing Dog Pose
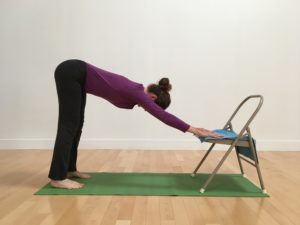
1. Hands on Chair Seat
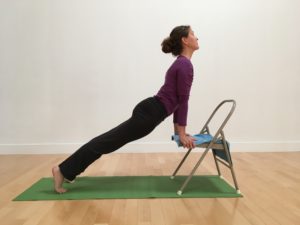
The Hands on Chair variation shifts gravity so there’s less weight on your arms and more weight in your feet. Because of this, it’s best to leave your toes tucked under, instead of trying to turn the tops of your feet to the floor. With less weight on your arms, this variation is also easier on your wrists and shoulders, if you’re dealing with discomfort or injury there. But with less weight in the arms, it also helps to slow down the pose and really examine each step to be sure you’re taking necessary precautions to keep your pose strong.
To practice this variation, position your hands on the chair seat, with your shoulders directly above the heels of your hands. Fingers can face forward, toward the back of the chair, or can wrap around the sides of the chair seat. (Turning your hands sideways can really alleviate strain in wrists.) Then step back into a Plank pose.
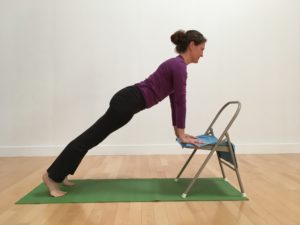
From here it’s easy to lift your hips and press into a Downward-Facing Dog pose shape.
Finally, lift into your back body to come back into to the Plank pose again. Staying lifted, start to press with your toes to feel the sensation that your head is extending past your shoulders a little bit. The next part is almost like a struggle. Your body is trying to remain in Plank pose while your toes keep pressing forward (your quads and abs are working here), and your breastbone endeavors to press its way between your arms and your hips do press forward and come down slightly. It would be easier to drop your hips and swing your chest forward, but we’re going for strength instead of ease here, so stay lifted!
As you practice, the pose, keep your collar bones wide, with shoulder blades drawing in toward one another and down your back. And keep your neck long, look forward or glance gently upward, but don’t throw your head back. Hold for a few breaths before lifting your hips again to press back into Downward-Facing Dog. Try this a few times until it feels strong and natural. If maintaining the shape here is easy, you could try holding the pose for up to a minute before releasing back into Downward Dog for a few breaths, then either have another go or walk the feet toward the chair to come out.
Maybe this is where you want to work for a while, building strength to move onto the next variation. Or maybe, if you have wrist pain or generally need more support, this will be the best version for you to practice and you can stay in the pose for longer and longer periods of time as you build up your strength.
2. Hands on Blocks, Bolster Under Thighs
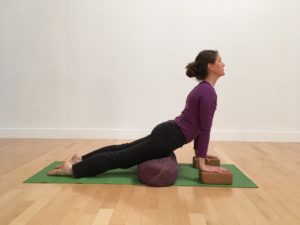
For beginners or those slowly exploring the pose, this is a good way to get a feel for the classic pose, with a different relationship to gravity. It’s a nice variation if you have wrist pain, and it simply won’t let you sink your hips, if that is what you are working on. This variation shifts gravity a little closer to the classic pose. The weight in your arms will be more pronounced, so keeping your hips lifted can be even more of a challenge. But the blocks help create some space below the pose, which is especially helpful for those with shorter arms, and can take some of the strain out of the hands and wrists.
Position your props so that the blocks are flat (on the lowest height), place your palms on the blocks, directly under your shoulders when you are Plank pose, and position the bolster so will be lined up with your mid- to upper-thighs when you’re in Upward-Facing Dog.
To come into the pose, with your hands on the blocks, press back into Downward-Facing Dog pose and then glide forward into Plank pose. Then use your toes, pressing your whole long body forward, and find that struggle between your body trying to remain in Plank, but your breastbone turning forward and endeavoring to press between your arms. Your hips will drop a bit here and press forward, but your thighs should only lightly touch the bolster. I like to keep my toes tucked under for this one, but if that’s easy, you could also come onto the tops of your feet as shown in the photo if you feel ready. In my experience, having the bolster there allows me to play with the balance between keeping lifted, and coming into the backbend. If you have a tendency to drop your hips, it will quickly remind you to find the lift, and if, like me, you tend to hold more than release, it gives you a chance to relax into the support of the bolster a little bit.
Hold for a few breaths when you’re just getting started, and work your way toward a one-minute hold.
3. Hands on Blocks
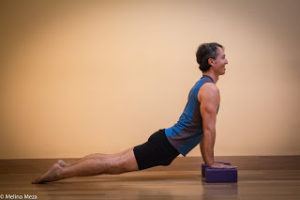
This variation is wonderful for people whose arms are on the shorter side in relation to their torsos because it allows you to lift off the ground more easily and makes the pose feel more spacious. And even though I have longer arms, my torso is equally long, so I honestly never like to do Upward-Facing Dog pose without blocks.
To practice the pose, follow the same steps as described above for version 2. As in that variation, be careful about maintaining your lift as you press forward because it’s easy here to let the hips sag. Like in the bolster version, you can practice this pose either with your toes tucked under, or the tops of your feet on the floor. I like to come into any variation of Upward-Facing Dog for a few breaths to begin with, come out by pressing into Downward Dog, and take a little break, then work toward holding for longer. A good goal to work toward is a one-minute hold.
4. Classic Version
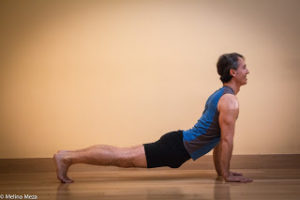
You can practice the classic version of the pose either on the tops of your feet or with your toes turned under. Turning onto the tops of your feet can be tricky, especially if you have tightness in your ankles, so if this is a new pose for you, be gentle as you explore what feels comfortable for you. There’s no problem with keeping the toes tucked under for a little while, or even forever if that works best for your body. For wrist safety, always be sure that your shoulders remain directly above your wrists (a common tendency here is for the shoulders to push forward of the wrists, which can cause wrist strain).
There are a few ways to get into the pose. I’ll mention two here. The first is starting in Downward-Facing Dog pose, gliding forward into Plank, then pressing forward, in essence, dropping down into the pose from above. (This is the same way I suggested entering the previous variations.) I recommend coming out either by lifting your hips and coming back to Downward Dog, or just lifting the hips enough to gently lower your knees down to a kneeling position on the floor.
The other entry I’ll mention here is to start lying prone (front body flat on floor) your palms down, near your middle ribcage, fingers near the armpits, lengthening in the direction of the head. Your toes can be pointed here, with the tops of your feet already on the floor.
From this vantage, you can begin with Locust pose (Salabasana), engaging the length of your back body, before pressing your hands into the floor, straightening the arms to lift your chest and eventually your hips from the floor, feet pressing down to assist the arms with the lift. Pressing up from the floor seems easier in theory, but you need strength to do this with integrity—arm strength for the push-up and back strength to lift away from the floor—and also more awareness of your front body support, so that you don’t lift up a limp body with sagging hips. You might choose to come out of this entry by lifting into Downward Dog, but if you have the arm strength, you might experiment with lowering down the way you came up.
Working in the Poses
Every variation described here requires the same work in your back body, legs, and core. The main difference is the amount of gravity pulling you into the pose, which changes the weight distribution, and can shift your focus from just trying to get through the pose, to taking your time, slowing down, and exploring the pose.
As you practice any of the variations, move your breastbone between your upper arms and keep drawing your shoulder blades down, which will keep your shoulders from creeping up toward your ears. You can imagine that there’s a strap attaching the base of your skull to the backs of your heels, and as it cinches tighter, it pulls them toward each other as the hips dip slightly (but remain active) and your breastbone lifts forward and up, the head following the curve of the backbend. Check to make sure you’re not gripping in the sides of your neck.
Next, focus on spreading the backbend across as much of your back as possible, instead of letting your lower back take on all of the bend as your hips sink. To guard against this collapse, engage your front body—your abdominal muscles and the quadriceps muscles in the fronts of your thighs—which will in turn lengthen the lower back. Your neck (cervical spine) should mimic the same curve that the mid and low back are taking.
Changing up regular habits can create space in your yoga practice overall, and taking the weight out of the low back can make a world of difference in your Upward-Facing Dog pose. If Upward-Facing Dog has been difficult for you, I hope you find some wisdom in what I’ve offered here!
Nina says more about timing and repetitions in her post Techniques for Strength Building with Yoga if you want to read more on this topic.
Find information on Bridget’s current classes here.
Follow Yoga for Healthy Aging on Facebook ° To order Yoga for Healthy Aging: A Guide to Lifelong Well-Being, go to Amazon, Shambhala, Indie Bound or your local bookstore.
Leave A Comment