
 by Bridget
Warrior I (Virabhadrasana I) is a great pose for strengthening your whole back body, from the base of your skull all the way to the heel of your back leg, plus your front leg gets a different kind of workout and even your arms can get in on the strengthening if your shoulders are up for it. The backbend in the upper body offers an opportunity to make full use of all of your back muscles, and the effort of pressing your feet into the ground and lifting your torso and arms away from the ground makes it an energizing pose for your whole body. It’s also a wonderful pose for working on balance and stability, and if those aren’t your strong suits, there are plenty of options for supporting yourself while working on the balancing and strengthening aspects of the pose. I’ll go over a few of them here.
1. Lunge Variation
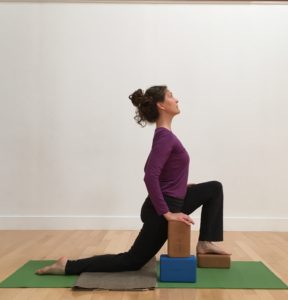
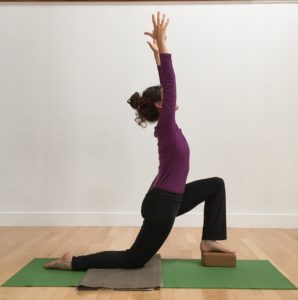
This is a good version to start with if your balance is unstable or just to warm up for a standing version. Set up for the pose by placing a block on its flat side for your front foot and stack up some blocks to support the hand that is opposite your front foot. To move into the pose, start with your hips shifted back, directly over your back knee (not pictured here), to find the verticality and the lift of your spine away from your hips. Now find the backbend action. Then as you bend your front knee and take your hips forward, keep your shoulders over your hips, instead of leaning forward. This should also result in a stretch for your back leg quadriceps (the front of the thigh), which could be a big stretch or a minor one. If/when you feel stable here, you could press your front foot firmly into the ground and use the downward force there to lift your arms up beside your ears.
2. Block Against Wall
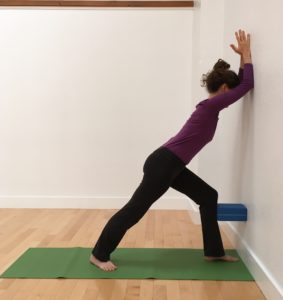
Working with front shin supported by a block is good for supporting your balance but also has other benefits, allowing you to really root into your back foot and feel the support of your back leg, as well as allowing you to find the transition from a long, straight body into the upper body backbend of Warrior I. To come into the pose, step one foot toward the wall, with your toes pointing straight at the wall. Then position the block on its longest height between your shin and the wall. The distance your toes are from the wall is just dependent on how long your foot is. Try to position your knee approximately above the heel. Step your back foot far enough back to find a straight body position from the back heel to your elbow points or fingertips. You can start with a long body, elbows bent, forearms on the wall. With your arms supported in this way, you can focus on supporting your torso instead of sinking onto your front body. Maintaining the lift in the torso, extend your arms long and come onto fingertips.
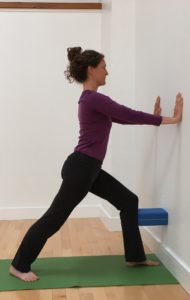
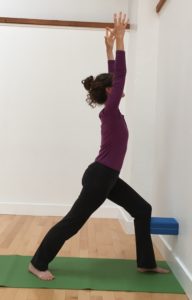
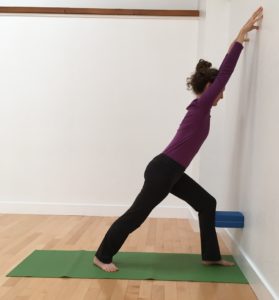
Now start to find the backbend. As you slide your hands down the wall, see if you can maintain an even bend throughout your back body. Once you get your shoulders balanced over your pelvis, you can lift your arms, coming into Warrior I, with your shin still supported by the block.
3. Chair Variation 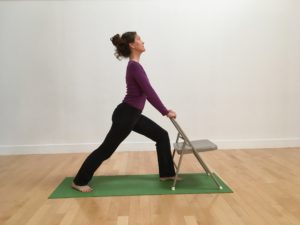 This is another variation that is helpful if balance isn’t coming easily. It’s also a good version if you want to keep your arms down because of a shoulder injury. Turn the chair seat away from you and step one foot forward so that your toes are under the back edge of the chair seat. Step your other foot back and turn it out at an approximately 45 degree angle. Lifting your spine and finding the start of a backbend in your upper body, begin to bend your front knee, bending as far as comfortable or until your knee is near to positioned over your heel.
4. Hands on Hips Variation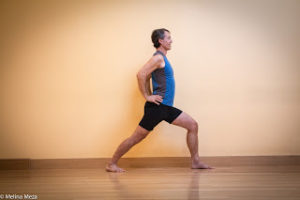 If your shoulders or back body feel fatigued or if you’re dealing with an injury there, you can place your hands on your hips. This takes the work, or the pain, of lifting your arms out of the equation and allows you to focus on the work in your legs and the lengthening of your spine. You can place hands on your hips in any of the variations where arms are overhead or even briefly for a rest when you’re holding the pose for a longer time.
5. Classic Pose There are also several helpful options within the classic version of pose. A nice way to really feel grounded in the back heel is to back up to a wall and have the heel in the corner, where the wall and floor come together. This is helpful if you tend to have a little bit of bend in that back leg, and it can even help with balance—the comfort of the wall supporting the back corner of your heel might be just enough for you. Another aid for balance is taking the feet a little wider (side to side) or possibly taking a shorter stride (bringing them in a little closer front to back), though if you choose this option, you limit the amount that your front knee can bend in the pose.
If your shoulders are keeping you from lifting your arms overhead, it might work to take them out to the sides, so there’s a straight line from left fingertips to right fingertips. This is an excellent place to really get your shoulder blades on board with supporting your arms, drawing them together and down the back, spreading the collar bones and finding the opening in the front body. As your shoulder blades draw in and your arms reach out, the work in your arms is palpable. For those of us who can bring the arms overhead, it’s important to notice the tendency to get that last little bit of lift by splaying the front ribs. It’s not necessary to get your arms any further back than the ears, and if your shoulders don’t allow that much mobility, just be where you are for now. Think about keeping your arms engaged as you extend the shoulder blades upward. Let the whole circumference of the arms work, drawing in toward the bones, to lengthen a little bit further. I always keep my hands shoulder distance apart, but if your lineage calls for it and you have the flexibility for it, you could bring your palms together here.
Now the head is important to think about as well. You can see how in the classic pose photo, the model is looking straight ahead. This is a good option to begin with or to use if you either have neck pain or a tendency to toss your head back while dropping the base of your skull. In order to get your neck into the right place to look up, you need to find the extension from lower down. Start the backbend by pressing your back heel, then let your pelvis tilt slightly and your spine lift. Feel the backbend through your whole spine as you lift your breastbone. Finally, feel length in the back of your neck, as if you’re lifting the base of your skull up over a soft pillow, and only then allow your chin and your gaze to lift.
The following section provides information about how to get into the classic pose as well as all the variations.
Working in the Poses
In all of the standing versions, your front foot should be aiming straight ahead, with your hips endeavoring to turn in that same direction. Your back foot should be approximately one-leg’s distance behind the other foot, and turned out to the side at 45-60 degrees. Imagine you’re standing on railroad tracks – each foot gets its own track. Don’t try to stand on one track with both feet (especially important if you’re concerned about balance!).
For all the variations, I like to take a moment with my torso vertical to really find the lift through my spine, then engage in my back body by drawing my shoulder blades in toward each other and down my back. This starts the backbend, but before you get too carried away, reach your arms forward, palms facing in toward each other, extend your shoulder blades toward your arms, and then keep all of that space in your shoulder sockets as you lift your arms overhead. With your arms overhead, you can start to feel your breastbone pressing forward and the sensation of the back body beginning to shorten as you engage all along the spine, as if a very large rubber band were stretched between the base of your skull and your back heel.
You can also engage your back leg, anchoring your heel into the ground, straightening the leg, turning the femur (your thigh bone) inward, but thinking about the muscles in the front and outer thigh actually turning out. With all of this engagement intact, feel your front thigh externally rotating as you start to bend your front knee. As you bend your knee, imagine that your fingers are being held from above, so even though you are bending that knee, lowering your body overall, your spine is being suspended from above and you are lifting toward the sky. Check in with your top shoulders and make sure you’re not gripping there, lengthen your front knee forward, away from your back knee, but keep your pelvis turning toward the front foot toes.
Circle through the instructions one more time, expanding and dropping into the pose to your best ability, then, to come out of the pose, straighten your front leg, turn both feet toward the long side of your mat, then either turn to do the pose on the other side or heel-toe your feet together to come into Mountain pose.
Find information on Bridget’s current classes here.
Follow Yoga for Healthy Aging on Facebook ° To order Yoga for Healthy Aging: A Guide to Lifelong Well-Being, go to Amazon, Shambhala, Indie Bound or your local bookstore.
I love these variations! Can you say more about the purpose of the block under the front foot in the kneeling version?