
by Bridget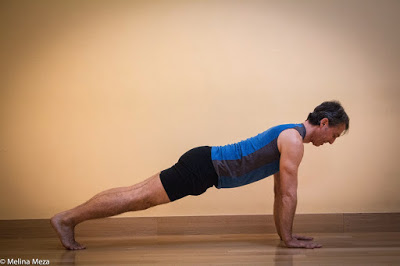 A couple of years ago, Plank pose gained some notoriety when it was revealed to be a staple of 85-year-old Supreme Court Justice Ruth Bader Ginsberg’s weekly workout routine. In honor of her 86th birthday, people gathered at the Supreme Court in Washington, DC to plank on the steps outside.
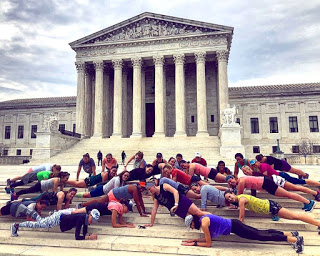 |
| Plank Pose on the Supreme Court Steps |
If done correctly, Plank pose is a safe pose that puts no unnecessary strain or compression on the spine. The isometric contraction (muscle contraction without any actual movement of the body or lengthening of the muscle) activates muscles throughout the body, including shoulders and arms, front and back core, and legs. The more you engage in the pose, the more benefits you’ll reap. Of course, proper alignment is important, so if you’re just getting started, pay close attention to the ways your body adjusts as it gets tired, and give yourself lots of time to rest between short attempts. As with all of these strength poses, we have plenty of options for you that take into account injuries or a need for less weight in the pose. I’ll discuss the alternative variations here before jumping into some suggestions for practicing the pose.
Variations of Plank Pose
1. Forearm Version
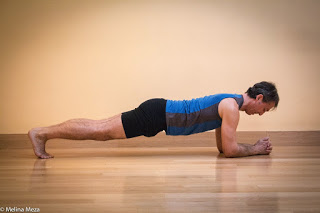
If it’s uncomfortable for you to be on your hands due to a hand or wrist injury, you can do the pose on your forearms instead. Two hand positions are possible here: interlacing your fingers and keeping your forearms parallel and flat on the floor. Interlacing your fingers is slightly easier, Be sure to balance your shoulders directly above your elbows. I find that while this pose does give the hands and wrists a break, it is not easier than the straight-arm position. So if it is too challenging, you can lower your knees to the floor.
2. Bent Knee Version
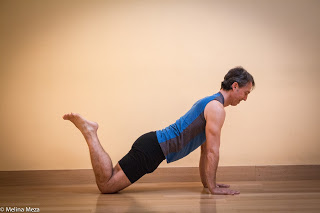
This version takes some of the weight out of the pose, shortening the length of your body that needs to be lifted away from the floor. You can also do this bent knee version on your forearms, as described above. To get into this pose, begin in a classic Plank pose, then lower your knees while still keeping your shoulders directly above the heels of your hands (or your elbows, if you’re on forearms).
3. Chair Version
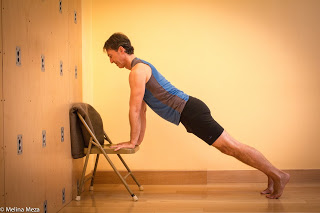
Putting your hands on a chair seat may resolve a few issues that can arise with Plank. First, there’s less weight in the pose because your body is angled away from the floor, so it’s an easier starting position for beginners. Second, there are hand position options here. If you turn your hands out, supporting your weight with the heels of the hands and letting your fingers drape over the sides of the chair, your wrists should be less grumpy. And if having hands down still doesn’t work for your hands or wrists, you can come to the forearm position on the chair seat.
4. Wall Version
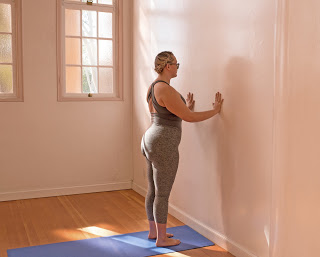
In this version, you can play with the angle of your body in the pose, even coming to an upright position, which can take the weight entirely out of it. This allows you to focus on the body positioning without the distraction of carrying too much of a load. Start with your heels directly beneath the hips and shoulders, arms out straight. Press your arms into the wall and tune into some of the instructions under “Working in the Poses” below as you experience a virtually weightless Plank. From here, you can step your feet back 8-12 inches and bring your hands down the wall a little bit so that they stay in line with your shoulders (this might be rough on the wrists, so you could use a folded sticky mat under the heels of your hands on the wall or come to fingertips). Be sure to maintain a long Plank body here, instead of letting the hips drift back. If you can maintain this position without losing track of the lift into the back body mentioned below, you can take it down to the chair as a next step.
Working in the Poses
Start in Downward-Facing Dog pose. Press firmly on the floor, with your weight even around all surfaces of your hands. Extend your shoulder blades toward your hands and lift your ribcage toward your hips. Once you find the lightness in Downward Dog, start to glide forward into your Plank pose. Try to keep your hips lifted as you move your shoulders forward, until they are directly over your wrists.
The hardest part for most people in this pose is to stay lifted into the back body instead of drooping down onto the front body. I like to think of there being a zip line connected to the base of my skull and to the backs of my heels that I’m pressing my whole body up into (rather than a net below me that I’m sinking into). Once you find the weight lifting into your back body, the pose should feel light (not easy, just light), almost as if you could float up off of your hands and feet.
From there, keeping your shoulders directly above your wrists, lengthen your body. Extend through the top of your head and the bottoms of your heels, stretching your whole body between them into a straight, light line. Press your hands into the floor and lift your ribcage up toward the ceiling (without curving the spine—this isn’t Cat pose). Bring your awareness to your abdominal organs and see if you can gather them up and press them back (up) toward your spine, as you keep lifting into your imaginary zip line.
Hold the pose for as long as you can maintain the integrity of the lift off of your arms and into your zip line. When it feels as if you’re sinking, lift back into Downward-Facing Dog pose before releasing your knees down to the floor to rest.
Nina says more about timing and repetitions in her post Techniques for Strength Building with Yoga if you want to read more on this topic.
Find information on Bridget’s current classes here.
Follow Yoga for Healthy Aging on Facebook ° To order Yoga for Healthy Aging: A Guide to Lifelong Well-Being, go to Amazon, Shambhala, Indie Bound or your local bookstore.
Leave A Comment