
by Leza
Most of us feel as if we carry the weight of the world on our shoulders. I know that years of hunching over a desk and typing at a computer have taken their toll on my neck, shoulders, and upper back. Tension builds up over time, and you might not realize how stiff you are until the muscles knot up or you feel a throbbing ache in those areas. In my case, having a pacemaker has made traditional yoga poses for shoulder release (such as Cow-Face pose or Wheel) problematic, as I don’t want to dislodge the leads. I’ve found this restorative shoulder-opening sequence helps me to release tension in the shoulders and neck area, finding more comfort and ease.
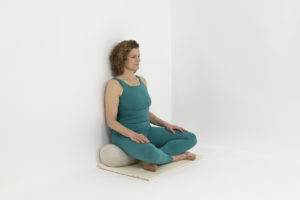
As a mental focus for your practice, you can either continue using the calming breath practice described in step 1 in all your poses or, if you’d rather do something simpler after step 1, place your hands on your heart, take a few deep breaths, and set a focus that aligns with your highest intention in this moment. I find it helpful to phrase the intention in the affirmative, for example, “I am relaxed” or “I am at peace” or “I am free of stress.” Throughout the practice, remind yourself of your intention by taking a deep breath and repeating the phrase when you notice the mind has wandered.
1. Calming Breath Practice (Extending the Exhalation), 3-5 minutes.
Find a comfortable seated position or lie down. Take a few full breaths, releasing any tension on the exhalations. Then consciously begin to focus on the breath, finding the place it is easiest to access—perhaps your belly or your chest. Don’t try to change anything, just become aware of the natural rhythm. You might notice how the belly and chest rise and expand on the inhalation, and then fall and contract on the exhalation. Notice and observe for a few minutes. As you bring your awareness to the breath, it might naturally begin to slow and deepen.
When you’re ready, practice extending the exhalation. You can do this by consciously lengthening the exhalation, making it longer than your inhalation. Practice this for 2-5 minutes, as long as you’re comfortable. You can also practice this breath in the restorative poses that follow, if it feels comfortable to do so. See this excellent article Calming Breath Practice: SOS for Panic Attacks and More by Nina for more detailed instructions on the practice.
When you’re done, if you are lying down, bend your knees and come onto your side, resting there for a few minutes. Place your hands on the floor and gently lift yourself up, head last.
Now, come onto your hands and knees on your yoga mat. Prepare the bolsters, blankets, blocks, chair, and any other props you will need for the sequence.
2. Cat-Cow Pose, 6 to 12 rounds.
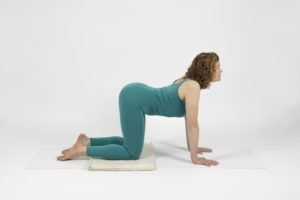
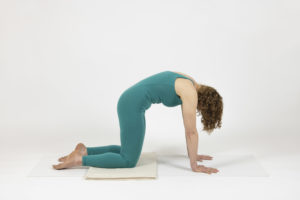
This gentle movement warms up the spine and releases lower back and shoulder tension. As you inhale and exhale, connect movement with breath, cultivating a non-judgmental present-moment awareness.
As you inhale, gradually arch your spine into the gentle backbend we call Cow pose. Moving from the pelvis, lift the tailbone and sitting bones as the pelvis tips forward. Release the belly while keeping the lower back down. Lift the chest and head, keeping the heart lifted and the collarbones spread as you press your hands into the ground. When you’re ready to exhale, move into Cat pose. Gradually round the spine toward the sky. Move from the pelvis, gently tucking your tailbone and bringing the sitting bones down as the pelvis tips backwards. Gently hollow the belly out towards the spine, releasing the neck and head toward the floor. If comfortable, your gaze can be at the knee. Allow your neck to be relaxed as you continue pressing your hands into the floor.
Enjoy the dance of movement and breath, noticing any sensations that arise. On the inhale, move back into Cow pose. Alternate between Cat and Cow pose for 6 to 12 rounds, or longer if desired.
For more information on how to practice this pose, see Featured Pose: Cat-Cow Pose.
When you’re done, move into Child’s pose.
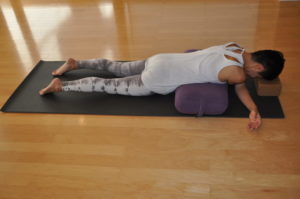
3. Restorative Shoulder Release, 2-4 minutes each side.
Restorative Shoulder Release pose uses gravity to help relieve upper back, neck, and shoulder tension. Lying on your belly, you cross your arms and use the weight of your chin on your arms to release shoulder tension. The pose eases stiffness in the neck and upper back, also gently stretching the spine, sacrum, and lower back.
For more information on how to practice this pose, see Featured Restorative Pose: Restorative Shoulder Release.
4. Supported Supine Twist, 2-4 minutes each side.
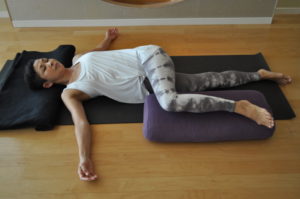
Supported Supine Twist is a wonderful way to release the entire spine while opening the heart and alleviating tightness in the shoulders and neck. This gentle twist relieves tension in the abdomen and stimulates the digestive system and kidneys. It also generates elasticity and strength in the core and wrings out abdominal organs to improve circulation throughout the gut. While it helps to stretch the back muscles, it also realigns and lengthens the spine, hydrates the spinal disks, and releases shoulder, chest, and neck tension. Supported Supine Twist is recommended for those who want an uplifting, gently stimulating pose that can release stress and help to elevate your mood. It can be beneficial when we need to offer ourselves gentle care and attention.
For more information on how to practice this pose, see Featured Pose: Restorative Supported Supine Twist.
5. Supported Seated Forward Bend, 3-5 minutes.
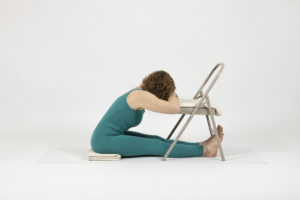
Seated Forward Bend stretches the entire back body and is a great release for the shoulders and neck. It also quiets the mind and soothes the nervous system. For support, place a bolster or stack of blankets on top of your outstretched legs. If a bolster or blankets are not available or a chair is more comfortable for you, use a chair instead for support. Fold your arms as shown, making a “pillow” with your hands to rest the forehead on. Make sure that your forehead is fully supported. This allows the back of the neck to release without engaging the shoulder muscles, so they can also relax.
For more information on how to practice this pose, see Featured Pose: Seated Forward Bend.
6. Chair Shoulderstand, 3-5 minutes.
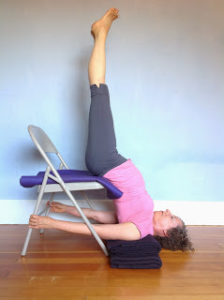
Chair Shoulderstand allows you to experience the “soothing” quality of Shoulderstand with added support from props. This is a completely inverted pose, enabling the relaxation response to kick in quickly (see Why You Should Love Your Baroreceptors). The neck is also flexed in the pose, which enhances the relaxation response. (See More Love for Baroreceptors).
Caution: Full inversions are contraindicated for a number of conditions, such as high blood pressure and various eye conditions (see Friday Q&A: Cautions for Inversions). So that applies to you, skip this pose. In addition, because this pose is a bit complicated to get into and out of, if you have never learned this pose from a trained teacher, we suggest that you skip it for now.
For more information on how to practice this pose, see Featured Pose: Chair Shoulderstand.
7. Basic Supported Relaxation pose, 5 to 15 minutes.
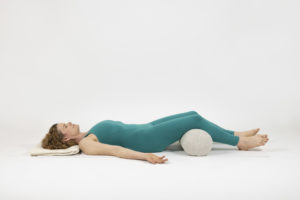
Basic Supported Relaxation pose is essentially a supported Savasana. This pose is a wonderful way to release the entire spine while opening the heart and calming the nervous system. It is a fully supported, easy-to-set-up Restorative pose that can release stress and promote calm. It can be beneficial when we need to offer ourselves gentle care and attention, and is the great way to end this shoulder-opening sequence.
For more information on how to practice this pose, see Featured Restorative Pose: Supported Relaxation Pose.
I hope this sequence offers you some relief from stiffness in the neck and shoulders. By bringing attention to the areas where we habitually hold tension, such as the shoulders, we shift our awareness and notice our patterns of holding, paving the way for healthier habits of self-care and nurturing.
For more about Restorative Yoga poses, see Restorative Yoga: The Big Picture.
You can read more about Leza’s writing at www.lezalowitz.com and about her yoga studio and classes at www.sunandmoon.jp.
• Follow Yoga for Healthy Aging on Facebook and follow Nina on Instagram • Order Yoga for Times of Change here and purchase the companion videos here • Order Yoga for Healthy Aging: A Guide to Lifelong Well-Being here.
Leave A Comment