
by Leza
Sometimes—almost always, really—less is more. The Basic Supported Relaxation pose is so simple to do and so effective, there is simply no excuse not to give yourself (or your students) this gift as often as possible. Although I can’t say I always succeed, it is my sincere aspiration to put myself in this comforting, deeply relaxing pose ten minutes every day.
Basic Supported Relaxation pose is essentially a supported Savasana. If you’re like me, you tend to overlook what is right before your eyes. It must be too easy, right? Well, it is! This pose is a wonderful way to release the entire spine while opening the heart and calming the nervous system. It is recommended for those who want a fully supported, easy-to-set-up Restorative pose that can release stress and promote calm. It can be beneficial when we need to offer ourselves gentle care and attention.
I do this pose when I am exhausted, busy, stressed out, anxious, or sad, when my back feels tight, and when my shoulders and neck are stiff. It’s a heart-opener that facilitates supported opening and release of tension all along the spine and in the belly, which tends to hold emotions like fear and worry. It is a deeply grounding posture. It’s the perfect pose to do when you need self-care, quietude, and nurturing. After 5-10 uninterrupted minutes in this pose, you will feel enormous benefits physically and psychologically.
Caution: Those with lower back injuries, retina problems, and those who are over 3 months pregnant should avoid this pose. If pregnant, lie on your left side to improve circulation to the heart (see 8 Ways to Practice Savasana for information and a photo).
Setting Up
To set up for the pose, you’ll need the following: yoga mat, 1 bolster for under the knees, 1 pillow for under the neck, 1 blanket to cover the body, and an eye pillow, washcloth, or soft scarf. A sandbag is optional. If you don’t have a bolster, you can use pillows or rolled-up blankets. If you don’t have a neck pillow, you can roll up a towel under the neck. If you don’t have a sandbag, you can use a bag of rice or other grains.
Start by spreading a yoga mat on the floor. Place a neck pillow or rolled-up towel or blanket at the top of the mat to support your head and neck. Place a bolster or rolled-up blanket at the bottom of the mat for under your knees.
To Come into the Pose
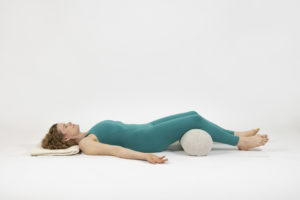
 Lie on your back with your knees bent and feet on the floor. Position your head on the neck pillow or head support so that the neck is long and the chin is tucked gently towards the chest.
Lift your feet up and over the bolster, and release your legs onto the bolster, so the backs of your knees rest on the bolster and your heels touch the ground. Let the legs relax and allow the feet to fall out naturally to the sides. This supports the hips to gently roll open.
When you’re settled, place the eye pillow, washcloth, or soft scarf over your eyelids.
Variations
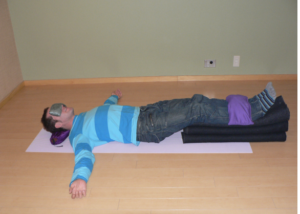
Elevated Legs: The pose is the same as above except you elevate your lower legs and your feet on a stack of blankets or bolsters to release tension in the lower back and create a gentle inversion of the legs. Another option is to rest your calves on a chair seat or ottoman.
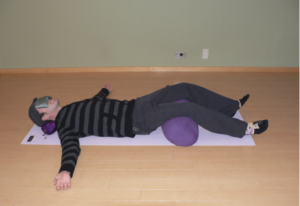
 Weight on Shins: You may also put a weight, such as a sandbag or folded blanket, on your shins as shown above. This relieves tension and fatigue in the legs and releases lower back compression.
Weighted Blanket: Trauma-sensitive practitioners and people with anxiety can cover themselves with a weighted blanket if desired. If you don’t have a weighted blanket, try using any thick blanket you have on hand. You can also place a bolster or rolled-up blanket on the belly.
Head Wrap: To engender a state of deep relaxation, wrap your head in cloth or scarf to cover the head, forehead, and eyes, keeping the nose and mouth uncovered to facilitate natural breathing. Relax all the muscles of the face. Particularly soften the third eye area and relax the brow. (Not appropriate for trauma-sensitive practitioners.)
Practicing the Pose
Roll your shoulders down your back. Soften the heart. Let your hips and lower back release. Let go of any holding in your legs. Let all the muscles of your face and eyes relax. Relax the parts of the body that are touching the ground, letting them sink into the ground and be held by the earth.
Sense all the places you feel your body making contact with the props and the ground. Take several slow, deep breaths to release your weight, melting into the support. Then bring your awareness to the entire spine. As you inhale, soften into any areas you feel need releasing—sacrum, lower back, middle back, upper back, shoulders. As you exhale, let go into the pose, melting into the props and the earth. Eventually bring your awareness to your front body—groins, pelvis, belly, heart center. Inhale deeply. As you exhale, continue to melt deeper into the support, releasing earthward.
Notice the sensations in your body and any emotions that arise. Notice without judgement, holding them in loving awareness. You can also try releasing tension, stress, anxiety, worry, and exhaustion on the exhalation and cultivating peace, self-love, and comfort on the inhalation. As you drop into a greater sense of stillness, anchor your awareness in the sensations in your body by following the breath as it moves in and out, finding stillness as you open and expand into the pose.
Stay from 5-10 minutes, as long as there is no discomfort. When you are finished, bend your knees and take a few breaths. When you are ready, slowly take your time to roll onto your side and enjoy a few quiet breaths there before coming up slowly, bringing your head up last.
You can read more about Leza’s writing at www.lezalowitz.com and about her yoga studio and classes at www.sunandmoon.jp.
• Follow Yoga for Healthy Aging on Facebook and follow Nina on Instagram • Pre-order Yoga for Times of Change: Practices and Meditations for Moving Through Stress, Anxiety, Grief & Life’s Transitions here • Order Yoga for Healthy Aging: A Guide to Lifelong Well-Being here
Leave A Comment