

Spring Love by Beatriz Milhazes
by Leza
All care starts with self-care. If we don’t fill our own cups, we won’t have much to pour into another’s. One good way to practice self-care is by making your yoga practice a priority. If you start your day with a short sequence focusing on self-care, this frames the entire day in a mindful, nurturing way, starting with the most important person in your life—yourself. Then, you have more to give to family, friends, your community, and the world at large.
Before practicing this sequence, I find it helpful to set an intention, phrasing it in a positive way like an affirmation. Some examples are: “I am at peace,” “I am relaxed,” or “I am grateful.” Take a moment before starting your practice to place your hand on your heart and ask yourself what is needed in this moment. That can be your intention, so that whenever your mind wanders, you can guide it back to the mental focus you gave yourself at the outset.
This sequence is simple to do and so effective. It starts with a heart-opening pose, followed by a spine release and a back stretch, and ends with an inversion before Savasana. I always feel so much more relaxed and spacious after this practice. I hope this sequence offers an uplifting, gently stimulating yet relaxing practice that releases stress and helps to elevate your mood. Practice it whenever you need to offer yourself gentle care and kind attention.
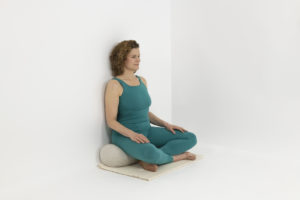
1. Calming Breath Practice (Extending the Exhalation), 3-5 minutes.
![]()
Find a comfortable seated position or lie down. Take a few full breaths, releasing any tension on the exhalations. Then consciously begin to focus on the breath, finding the place it is easiest to access—perhaps your belly or your chest. Don’t try to change anything, just become aware of the natural rhythm. You might notice how the belly and chest rise and expand on the inhalation, and then fall and contract on the exhalation. Notice and observe for a few minutes. As you bring your awareness to the breath, it might naturally begin to slow and deepen. When you’re ready, practice extending the exhalation. You can do this by consciously lengthening the exhalation, making it longer than your inhalation. Practice this for 2-5 minutes, as long as you’re comfortable. You can also practice this breath in the restorative poses that follow, if it feels comfortable to do so.
See this excellent article Calming Breath Practice: SOS for Panic Attacks and More by Nina for more detailed instructions on the practice.
When you’re done, if you are lying down, bend your knees and come onto your side, resting there for a few minutes. Place your hands on the floor and gently lift yourself up, head last. Come onto your hands and knees on your yoga mat. Prepare the bolsters, blankets, blocks, chair, and any other props you will need for the rest of the sequence.
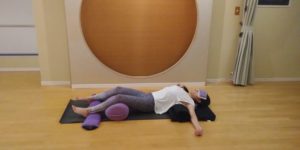
2. Mountain Brook, 3-5 minutes.
You’ll need the following: yoga mat, 1-2 bolsters, 2-3 blankets, 1 neck pillow, 1 eye pillow.
Start by spreading a yoga mat on the floor. Place the yoga bolster horizontally across the middle of the mat. This will support your upper back. (If using a bolster feels too intense or you don’t have one, see Featured Pose: Mountain Brook for variations.)
Next, fold a blanket in half and place it on the mat above the bolster. This will pad the mat under your head and shoulders. Place a neck pillow or a rolled-up blanket or towel at the head of the mat on top of the folded blanket you’re using for padding. This will support your neck so your chin is parallel to your chest and your head is not tilting back. Place a bolster or rolled-up blanket where your knees will be toward the foot of the mat.
Lie down over the props so that your body is gently draped in a wave-like pattern over the props, like water flowing over stones in a mountain stream. The bolster should be under your chest but not your shoulders. Your ribcage should feel as if it is “spilling out” to the edges of the bolster as the chest opens wide, and your shoulders should be releasing down to touch the floor. Release your neck onto the neck pillow or rolled-up towel so that the natural curve of your cervical spine is supported. Your head should be on the other side of the neck support, releasing down to touch the floor.
Extend your legs out over the second bolster or blanket roll, and allow your knees to rest on the support. The prop under your knees will help release the lower back, like a hammock. Rest your arms at your sides in a comfortable position. Allow your thumbs, palms of your hands, and your fingers to soften. Make sure you are evenly laid out, supported, and comfortable. If desired, cover your body with a blanket and/or cover your eyes with an eye pillow.
See Featured Pose: Mountain Brook for more information on practicing this pose:
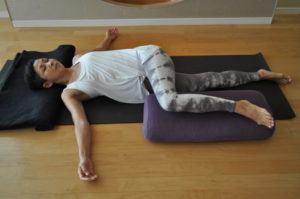
3. Supported Supine Twist, 2 to 4 minutes per side.
This pose is a wonderful way to release the entire spine, while opening the heart and alleviating tightness in the shoulders and neck. This gentle twist relieves tension in the abdomen and stimulates the digestive system and kidneys. It also generates elasticity and strength in the core and wrings out abdominal organs to improve circulation throughout the gut. While it helps to stretch the back muscles, it realigns and lengthens the spine, hydrates the spinal disks, and releases shoulder, chest, and neck tension.
You’ll need the following: yoga mat, 1-2 bolsters, 1-3 blocks, 1-2 blankets, eye pillow. A sandbag is optional. If you don’t have a bolster, you can use pillows or rolled-up blankets. If you don’t have a sandbag, you can use a bag of rice or other grains.
Spread a yoga mat on the floor. Place a rolled-up blanket at the top of the mat to support your head and neck. Place a bolster by the right side of the mat and a sandbag, if you have one, nearby. Lie on the mat with the curve of your neck supported by the blanket. Inhale and bend your knees, lifting your hips slightly to the left as you stack your left knee on top of your right and begin to twist to the right. Extend your right leg parallel to the bolster. Then exhale and drop your left knee onto the bolster, letting your right leg rest on the ground as you gently twist your spine and lower back.
Extend both arms out in a T-position with the hands relaxed and the palms turned up. Keep your shoulders flat to the floor, close your eyes, and relax into the posture. Let gravity pull your left knee down, so you do not have to use any effort in this posture. Cover your eyes with an eye pillow if desired. Change sides. See Featured Pose: Supported Supine Twist for more information on practicing this pose.
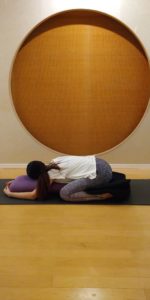
4. Supported Child’s Pose, 1.5 to 2. 5 minutes per side.
This deeply restful pose calms the nervous system, nurturing both body and spirit. It brings awareness away from the external world and into your own inner landscape, where you can send yourself loving thoughts and care.
You’ll need the following: a blanket and a bolster. If you don’t have a bolster, you can stack two folded blankets instead. Place your bolster horizontally in the center of your mat or fold two blankets into rectangles and stack one on top of the other to act as a bolster. If your knees need cushioning, place a folded blanket in front of the bolster or blanket stack.
Kneel at the back of the bolster or blankets so your knees, legs, and feet are on the ground or the cushioning blanket. Point your toes backward (do not tuck them under), with your big toes lightly touching and your knees bolster-width apart. Before bringing your bolster into position, sit down on your heels.
Slide the bolster or blanket stack so that the prop touches your mid-inner thighs. Keeping your hips low, fold your belly and chest over the bolster, turning your head to the side so your cheek can rest on the support. Allow the prop to support the entire front body. If there is a gap between your buttocks and feet, place a blanket under your buttocks.
When you’re comfortably supported, bend your arms at the elbows while keeping your upper arms in line with your shoulders. Rest your forearms on the floor, parallel to your body. If you are resting on one cheek, change sides. See Featured Pose: Supported Child’s Pose for more information on practicing this pose.
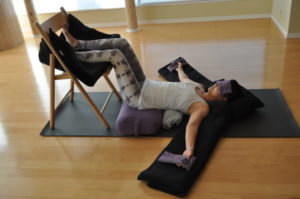
5. Instant Maui (Easy Inverted Pose), 5-15 minutes.
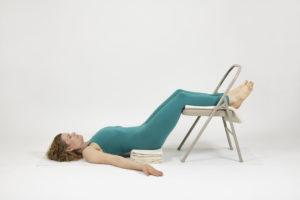
You’ll need the following: a chair with an opening at the back (or a couch or ottoman), a bolster or blanket stack, and an optional neck pillow or rolled-up towel to place under your neck, if desired.
Place the chair at the foot of the mat or bring the mat up to the edge of a couch or ottoman. Fold a blanket into a square and place it on the seat of the chair (leaving some hanging over the sides/edge to fold over the feet). Taller people may need to add extra blankets on top of the chair so their calves can rest comfortably on the support.
Place a bolster horizontally across the mat, at least several inches away from the legs of the chair or the edge of the couch. The longer your legs are, the further away from the chair legs or edge of the couch the bolster needs to be—taller people may need to have it as a foot or even more away. When you’re in the pose, your thighs should be at a comfortable angle, not straight down from the support.
If you want to provide cushioning for your head, place a blanket or neck support where your head will be. Keeping your pelvis on the bolster, scoot up close to the chair, so that your knees rest right at the chair edge. Place the back of your calves evenly on the chair or couch. If it’s comfortable, your feet can rest against the back of the chair like the photo on the right but people with longer legs will need to take their feet through the opening at the back of the chair in order to have the backs of their knees at the edge of the seat like the photo on the left. If your chair has no opening, you can turn it sideways.
Lie back onto the props and ground. If you’re using them, make sure your blanket and neck pillow provide ample support under your head and neck (all the way to your shoulders) so that you can drop your chin and look toward your heart. If your legs aren’t relaxing comfortably on the support, try moving the bolster or adding more blankets under your legs.
Allow your chest to be broad and soft. Extend your arms away from the body, palms up. Allow the backs of your hands to rest on the floor, and let your fingers be soft. See Featured Restorative Pose: Instant Maui for more information about how to practice this pose.
6. Supported Relaxation Pose, 5-15 minutes.
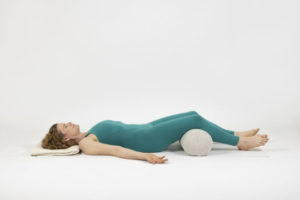
You’ll need the following: yoga mat, 1 bolster for under the knees, 1 neck pillow or rolled towel for under the neck, 1 blanket to cover your body, and an eye pillow, washcloth, or soft scarf. A sandbag is optional. If you don’t have a bolster, you can use pillows or rolled-up blankets. If you don’t have a sandbag, you can use a bag of rice or other grains.
Place your neck pillow or rolled-up towel or blanket at the top of your mat to support your head and neck. Place a bolster or rolled-up blanket at the bottom of the mat for under your knees.
Lie on your back with your knees bent and feet on the floor. Position your head on the neck pillow or head support so that your neck is long and your chin is tucked gently towards the chest. Then lift your feet up and over the bolster, and release your legs onto the bolster, so the backs of your knees rest on the bolster and your heels touch the ground. Let your legs relax and allow the feet to fall out naturally to the sides. This supports the hips to gently roll open.
When you’re settled, place the eye pillow, washcloth, or soft scarf over your eyelids. Before releasing into the pose, you might repeat your intention or affirmation a few times, then release that, too.
See Featured Restorative Pose: Supported Relaxation Pose for more information about practicing this pose.
You can read more about Leza’s writing at www.lezalowitz.com and about her yoga studio and classes at www.sunandmoon.jp.
• Follow Yoga for Healthy Aging on Facebook and follow Nina on Instagram • Order Yoga for Times of Change here and purchase the companion videos here • Order Yoga for Healthy Aging: A Guide to Lifelong Well-Being here.
Leave A Comment