
by Ellen Saltonstall
In my post Arthritis of the Knees, Part 1: What It Is and What Causes It, I described what osteoarthritis of the knees is and what is known about the causes. In this post, I’ll address how you can use yoga to prevent and/or slow the progression of arthritis in your knees and how to get the most from your practice.
I’ll be covering two causes of osteoarthritic damage to the knees that we can influence with yoga:
- Alignment
- Muscular weakness, stiffness, or imbalance
Note: The knees rely on alignment and actions in the feet and the hips, and you’ll see that concept included below.
1. Alignment
Starting with the feet, here are some ways to work on your knee alignment.
The Four Corners of the Feet Give a Base of Support to the Knees

Using this image balance the weight on all four corners of your feet, which will activate muscles in your feet and support the alignment of the legs as a whole. I like to practice in this order, but you can experiment: 1) inner heel, 2) little toe mound, 3) big toe mound, and 4) outer heel. As you do this, feel the muscles in your feet wake up!
Find the Neutral Alignment of the Knees with Parallel Feet
Ideally, when looking from the front, we want the vertical plumbline of the legs to be two straight parallel lines from the hip joints, to the centers of the knee caps, to the centers of the ankles. But many of us do not fit that ideal pattern.
The most common knee misalignment I see is one in which the knees rotate inwardly toward the midline, often with a “bowing out” of the lower legs.

Here’s how you can work toward the neutral alignment of the knees.
- Align the feet parallel and hip-width apart.
- Spread your toes and balance the weight on the four corners of the feet.
- Bend your knees and carefully point the kneecaps toward the second and third toes. Watch to see what actions you need in order to do this. Is it turning your knees more outward? Is it widening them apart? Often it is both of these.
- Practice this as a movement in itself, then integrate what you learn from this into your standing poses.
![]()
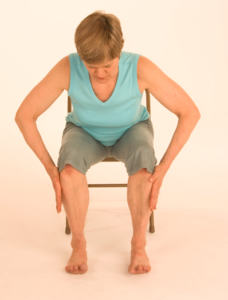
Reinforce this by strengthening the hip muscles that support the hips and knees by practicing the following: Sit in a chair, align your legs as above, and place your hands on the sides of the legs just below your knees. Push in with your hands and out with your thighs, creating an isometric widening action.
Once you learn this, it can be applied in any yoga pose.
Hyperextension
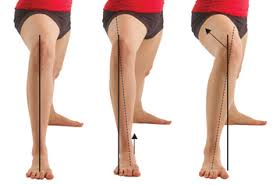
Hyperextension of the knees is an example of hypermobility, usually caused by congenital features of the connective tissue, bony shape, and muscular imbalance. This time we look at the plumbline from the side.

This condition can be improved by careful body awareness (what feels “natural” might not be necessary or beneficial) and specific strengthening to oppose the direction of dangerous exaggerated extension of the joints. The quadriceps (front thighs) straighten the knees, and the gastrocnemius muscles (back of the calves) bend the knees, along with the hamstrings. With hyperextension, there is an imbalance from front to back. I recommend strengthening the gastrocnemius to create a check on the action of the quadriceps. The gastrocnemius are multi-purpose muscles—they lift the heels and bend the knees. Standing on your toes with your knees slightly bent can activate them (try it in Mountain pose, Tadasana, or Powerful pose, Utkatasana) to remind them of their protective role in preventing hyperextension when the knees are straight.
In hyperextension, the lower leg moves back more than the upper leg when the knees straighten. This could be due to the shapes of the bones inside the joints, but it’s worth trying to minimize it to protect the delicate structures inside the knee joints. You can creatively use props to increase awareness of the movement of the thigh bone (femur) and shin bone (tibia) as you straighten the leg in seated poses, such as Seated Forward Bend, Pascimottanasana, or Head to Knee Forward Bend, Janusirsasana, by using a small folded towel under the upper calf while strongly contracting your front thigh muscles (quadriceps) to straighten the knee. Usually hyperextension will cause your heels to come off the floor in these seated poses. If possible, have a friend push your ankles down. This will counteract the habitual muscular patterning that contributes to pushing the lower leg and knee back too far.
In Triangle pose (Trikonasana) and Pyramid pose (Parsvottanasana), you can position a block under your calf to restrict it from going into hyperextension.


Also push down into the balls of your feet, activating the support of the gastrocnemius behind your knee. Don’t worry about practicing with a slightly bent knee for a while—it takes time to change habits. See Working with Knee Hyperextension in Straight Leg Poses for a video that demonstrates this.
Avoid Torquing the Knee in Asymmetrical Standing Poses
Torquing the knee is what happens when you turn your foot out more than your thigh and/or pelvis. This is particularly common error in the back leg of Warrior 1. When we turn the pelvis one way (for instance, facing forward for Warrior I) and the foot in a different direction (the back foot turned out to the side in Warrior I which helps us balance), the knee is caught in the middle and the joint is twisted, which it is not built to do more than a very small amount. Here is an example:
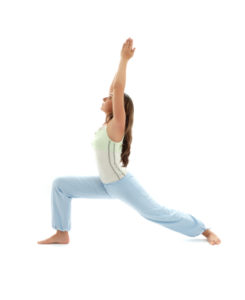
I recommend aligning the pelvis straight forward (which is better for the sacroiliac joint) and turning the back leg and foot only very slightly outward. You can achieve this in two stages: At first you can practice with the back heel off the floor to avoid any knee torquing. Then, when you’re ready for the next step, carefully turn the back leg out a small amount to bring the heel down. The entire leg (from the hip) turns out slightly, with the foot pointing in the same direction as the knee. The pelvis can remain facing forward, but that takes some conscious intention, because it will naturally want to turn toward the back leg side. Placing your back foot slightly more forward and also wider from the midline will help you align well and avoid knee pain.


2. Muscular weakness, stiffness, or imbalance
If you do not have a diagnosis of osteoarthritis and you want to avoid it, practice a full range of poses for the knees, consistent with your fitness level. You want the synovial fluid to circulate to feed the cartilage. Straight leg poses will build stability and bent leg poses will allow for precise alignment refinement.
To practice when you already have significant osteoarthritis: Move in each range of motion with more caution and more props. Especially stretch the larger muscles that cross the knee: the quadriceps (front thigh muscles, the hamstrings (back thigh muscles), and the gastrocnemius (calf muscle). Stretching these large muscles will reduce the pressure on the arthritic joints.
First I’ll address what range of motion in the knees entails and suggest various poses for moving your knees within their range of notion. Then I’ll discuss the relationship of the pelvic floor to the knees.
Ranges of Motion in the Knees
The basic four knee movements are:
- Flexion: bending the knees
- Extension: straightening the knees
- Slight inner rotation: Hero pose (Virasana) and related poses
- Slight outer rotation: Ankle-to-Knee pose and Lotus-related poses
To understand what the range of motion is in your knees, start by learning about the difference between rotation of the hip joint and rotation of the knee joint. You can experiment with one leg without weight on it.
Turn the whole leg in and out from the hip joint and watch the range you have in that movement. Then restrict your thigh bone your hands and turn just the lower half of the leg in and out. There’s a big difference. Notice that there is a very small range of rotation (inward and outward) at the knee joint.
In standing poses such as Warrior 2, Triangle pose, and Extended Side Angle pose, the hip is rotated but the knee should remain in line with the second and third toes
In poses such as Hero pose (Virasana) and Lotus pose (Padmasana) or Firelog pose (double ankle-to-knee, often called Double Pigeon), the knees are bending (flexing) a lot, but only rotating a small amount. Take extra care when going into these poses to first get the necessary action in your hips, then carefully adjust the knees into their small amount of rotation, with a spacer (towel or rolled mat) behind the knees.
Here are some poses that exemplify various demands on the knee joints:
- Parallel feet, knees bent: Refine alignment with Powerful pose (Utkatasana)
- Parallel feet, knees straight: Reclined Leg Stretch 1 (Supta Padangusthasana 1) and Downward-Facing Dog pose. These poses make it easy for you to check your knees visually. Use full strength in straightening your knee as much as possible.
- Outwardly rotated front hip and leg in frontal standing poses: Front leg in Triangle pose (Trikonasana), Warrior 2 (Virabradrasana 2), and Extended Side Angle pose (Parsvakonasana). Be sure to turn your upper thigh, your knee, and your foot completely to the side, as required by the pose, not just your foot. This way you avoid torquing the knee.
- Front thigh stretches: Wall Thigh Stretch and Hero pose (Virasana)
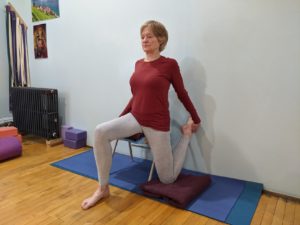

When practicing Virasana (Hero Pose), support your pelvis and legs on bolsters as shown, or blocks and folded blankets. These props help to make space behind the knees and avoid compression. Do not work through joint pain in this pose. A strong sensation in the quadriceps is fine.
- Sagittal poses such as lunges, including Warrior 1: Prioritize facing the pelvis straight ahead, and align the front knee very carefully toward the middle toes. Avoid turning the back foot out more than its upper thigh. Remember that each person has a different amount of rotation capacity at the hip joint, and that should be respected in how your place your foot and knee.
Caution: Pigeon pose is one of the more risky poses if you have knee arthritis because of the body’s weight plus the position of the front leg. Use a spacer behind the knee joint (a rolled towel works well) and place a blanket or two under your hips, adjusting it until your front knee is pain-free. It’s also helpful to press the little toe edge of the front foot down, which engages muscles on the outer side of the leg which support the knee. But omit this pose during a flare-up of arthritis. Here are ways to practice the front-leg action and the back-leg action separately.


The Invisible but Important Pelvic Floor
Strengthening the pelvic floor can lighten the load on the knees. Picture your upper body lifting from the strength of the pelvic floor, especially in standing poses. Be buoyant but also grounded. The abdominals will engage when you lift your pelvic floor, because they are connected via fascia, so you get a double benefit. See Stabilizing the Core Starts with the Pelvic Floor for information about strengthening your pelvic floor.
For more information about arthritis, see Ellen’s book Yoga for Arthritis, co-authored with Dr. Loren Fishman, 2010. Also, her Youtube channel includes several videos about knee health.
 Ellen Saltonstall, ERYT-500, C-IAYT, YACEP is an alignment-based yoga instructor and body therapist based in New York City with over 40 years of experience. Her background includes modern dance, a massage therapy practice, Iyengar Yoga and Anusara Yoga. She was certified in Anusara Yoga in 2001, then became a Subject Matter Specialist in anatomy and therapeutics. In addition to yoga, she teaches Bodymind Ballwork, a method of bodywork using rubber balls to facilitate tension release. Her published books include Yoga for Arthritis (2008), Yoga for Osteoporosis (2010), Anatomy and Yoga (2016), and The Bodymind Ballwork Method (2018). She offers yoga therapy webinars through YogaOnlineU.com, and she teaches nationally and internationally with a specialty in anatomy and therapeutics. She is known for her clarity, depth of knowledge, and enthusiasm in encouraging students of all levels to find freedom and joy through yoga. More information here.
• Follow Yoga for Healthy Aging on Facebook and follow Nina on Instagram • Order Yoga for Times of Change here and purchase the companion videos here • Order Yoga for Healthy Aging: A Guide to Lifelong Well-Being here.
Leave A Comment