
by Ellen Saltonstall
Today I’m excited to share a sequence with you that will appear in my upcoming book Yoga Practice Guide for Building Strong Bones and Improving Balance, which will be published by Emerald Lake Books in fall of 2023.
This sequence makes an ideal warm-up because it prepares your body for most of the basic components of a practice: Pelvic tilt to understand the lumbar spine/pelvis relationship, hip flexion to loosen the hips, twisting to loosen the spine and strengthen the abdominals, back bending for spine strength, hamstring stretching to prepare for Downward Dog and standing poses, and side stretching, which helps with all the other previous categories. The sequence achieves this without the complex demands of standing poses or Downward Dog. The skills developed here will improve your posture, as well as the safety and accessibility of the practice to follow. It is appropriate for anyone who can get down onto the floor. Being supine on the floor promotes a quiet, inwardly focused but vigorous beginning to the practice, building both strength and flexibility. It works well for a stand-alone short practice or a warm-up for a longer practice. If you worry that starting on the floor is “too easy”, try this once and see if you still feel that way! You can work strongly in every pose. Once you know it well, it takes about 15-20 minutes to complete.
SIX EVERYDAY POSES FOR AWARENESS AND WARMUP
1. Pelvic Tilt
Purpose: Awareness of easeful movement and coordination of the lower back and pelvis, with specific practice of this range of motion
Props: Yoga mat and optional blanket for comfort
Body position: On your back with your knees bent and feet flat on the mat
Instructions:
- Phase one: Press your lower back toward the floor, using your abdominal muscles. Notice that your pelvis will tilt in response, with the top rim of the pelvis moving back and down, and the sitting bones tilting upward. This is called Posterior Tilt of the pelvis.
- Phase two: For Anterior Tilt, push your sitting bones down and lift your waistline away from the floor, using your lower back muscles.
- Practice moving from one tilt to the other, as smoothly as you can. Try exhaling in phase one, and inhaling in phase two.
Things to watch for:
- Move fluidly, and coordinate your breath with the movement; for instance, breathing in as you arch, and out as your lower back flattens. As much as possible, isolate the movement in the pelvis and lower back, keeping your hips on the mat.
- Feel the difference between arching and curving your lower back, and what strength is involved in each movement.
- Play with how much effort you use, and how your breath is affected by this movement.
2. One Knee to Chest
Purpose: Hip and thigh movement, with abdominal support and without spinal flexion
Props: Yoga mat and optional blanket for comfort
Body position: On your back, beginning with knees bent, feet flat on the mat. Use a folded blanket under you for comfort if you wish
Instructions:
- Tone your abdominal muscles below the waist to stabilize your pelvis. Do this without changing your neutral pelvic tilt.
- Bring one knee to your chest, and extend the other leg out on the mat.
- Then switch legs, taking care to maintain engagement of your core muscles.
- Alternate this way from one side to the other at a moderate pace, as many times as you wish.
Things to watch for:
- Stabilize your pelvis and lower back as you move your legs.
- Maintain a steady pattern of breath.
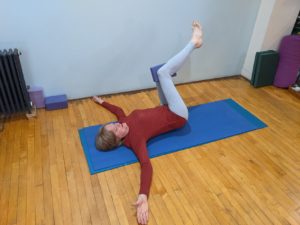
3. Supine Twist (Jathara Parivartanasana)
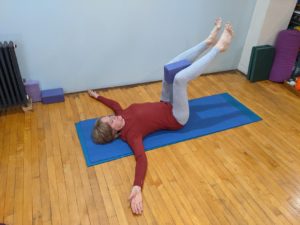
Purpose: To strengthen the core muscles of the spine and torso, and learn to twist with a long spine
Props: Yoga mat and optional blanket under your pelvis or head and neck for comfort
Body position: On your back, knees bent, arms stretched to the sides, palms facing up
Instructions:
- Bend your knees and place a block between them (narrow, medium, or wide setting, your choice), keeping your feet at least as high as your knees, or higher. Squeeze the block.
- Flex your ankles and spread your toes.
- Press your arms and shoulders down into the mat to stabilize your upper torso.
- Move your legs at a moderate pace from right to left, breathing smoothly. Begin by moving a small amount, and increase how far you twist as you feel ready.
- When you are tired, come back to center, remove the block, place your feet flat, and rest.
Things to watch for:
- Keep your shoulders on the floor, and notice the strengthening actions in your twisting muscles (spine and abdomen). This is very good core work, because you are working dynamically through a range of movement, while stabilizing.
- Notice that the floor helps you to maintain a long spine.
- Keep your neck neutral: not pressing it down or lifting it up.
4. Windshield Wiper
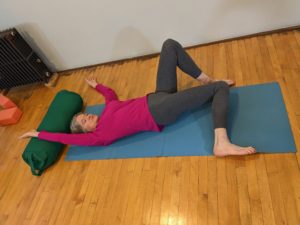
Purpose: To actively stretch the side of the body
Props: Yoga mat and optional blanket and pillow or bolster for comfort
Body position: On your back with your knees bent, feet wide apart on the edges of the mat, and your arms stretched back alongside your head, palms facing upward. If this is uncomfortable for your shoulders, place a pillow or bolster above your head and rest your arms there.
Instructions:
- Incline your right knee across toward your left foot, allowing your right hip to lift slightly off the floor. Your right knee should not contact your left leg, which is why you began with your feet quite wide apart.
- Allow the little-toe edge of your right foot to lift off the floor.
- Leave your left knee pointing upward to stabilize your pelvis.
- Elongate your right upper leg and your right arm in opposite directions, lengthening the entire right side of your body.
- Feel your breath, as the ribs and lungs are participating in this pose.
- Repeat on the other side.
Variation: You can grasp one wrist with your other hand to extend further.
Things to watch for:
- Enjoy some deep breaths, and notice where you feel the stretch.
- Be sure to actively lengthen the side body, rather than allowing only the body position to create the stretch.
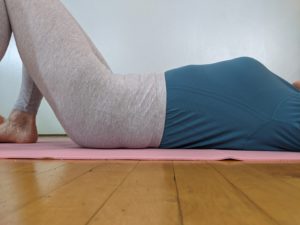
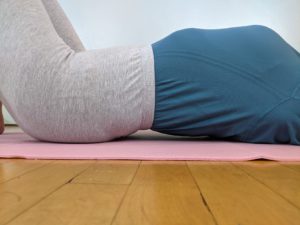
5. Bridge Pose (Setu Bandhasana)
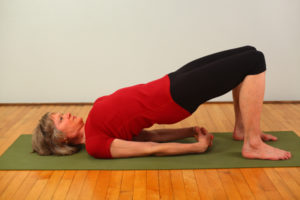
Purpose: To stimulate the vertebral spine, the femur bones, and the shoulders, and to strengthen the muscles for spinal, hip, and shoulder extension for posture improvement
Props: A yoga mat and possibly a blanket
Body position: On your back with your knees bent, feet flat, parallel and hip-width apart. Your arms are about 4 inches away from the sides of your body, either bent or straight. If your arms are straight, turn your palms up.
Instructions:
- Tuck your shoulders under toward your spine, one at a time.
- Press down through the four corners of your feet and lift your hips. Point your knees straight forward toward your middle toes.
- Lift your tailbone and your chest strongly.
- Tuck your shoulders under you more if possible, which will help you to lift your chest.
- Remain in the pose for at least 20–30 seconds with a steady breath.
Things to watch for:
- If you have a kyphotic (rounded) thoracic spine, support your shoulders on a folded blanket as shown.
- Avoid turning your feet outward; maintain the four corners pressing down.
- To avoid lumbar compression, pull your ribs toward your head and pull your pelvis toward your knees. Lengthen!
- Maintain a steady breath.
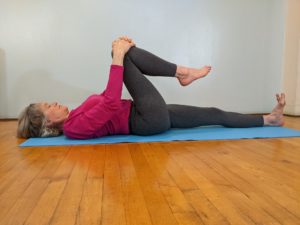
6. Supine Leg Stretches with the Belt (Supta Padangusthasana)
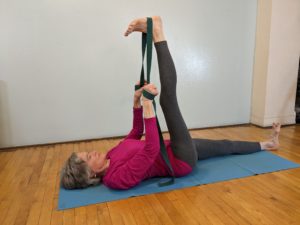
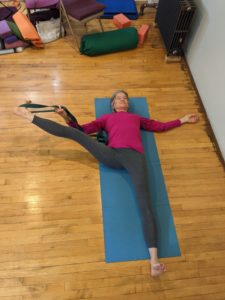
Purpose: To stretch the hamstrings with the proper pelvic tilt, to prepare for Downward Facing Dog and standing poses, to stimulate the femur bones, and to feel movement at the hip joint while stabilizing the pelvis.
Props: Yoga mat and belt, and an optional blanket under your back for comfort
Body position: On your back on the mat
Instructions:
Part 1
- Begin with both knees bent, and practice the pelvic tilt to remember the action that creates the anterior tilt.
- Bend your right leg and loop the belt around your foot. Hold the belt with your arms gently outstretched and your shoulders on the mat. Recreate the anterior pelvic tilt again.
- Straighten your right leg strongly, contracting the muscles just above your knee. Adjust your hands on the belt accordingly.
- Extend up through your heel.
- Extend your left leg out on the floor and press the thigh into the floor, which will stabilize the anterior tilt of your pelvis and make the stretch of the right leg more intense. Or, if your right leg is angled forward beyond a vertical angle, or you would prefer less intensity, keep the left leg bent.
- As you pull with the belt, push your thigh (especially at the hip area) away from your upper body, opposing the pull of the belt. This creates a dynamic action in your hip area which stimulates the femur bone and dynamically stretches your hamstring muscles.
- The angle of the leg will vary from one person to another, and will change as you practice this pose over the long term.
- Hold the pose at your stretch threshold for 15–20 seconds, breathing naturally.
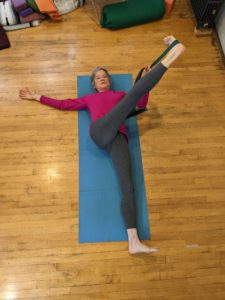
Part 2
- Hold the belt with your right hand, and move the leg out to the right, at an angle that is manageable for you, while keeping the left hip down on the mat.
- Engage your abdominals to stabilize your pelvis, and expand from there out through both heels.
- Hold there for 15–20 seconds, breathing naturally. Notice the abdominal work required.
Part 3
- Hold the belt with your left hand, and move the leg across your midline, at an angle that creates a stretch in your outer thigh and hip. Your right hip will be slightly off the floor.
- Keep the action of your thighs widening as your foot moves across.
- Stabilize your pelvis, and expand from there out through your right heel with your knee straight.
- Hold for 15–20 seconds, then release, breathing naturally.
- Repeat all three parts with the other leg.
Things to watch for:
- Relax your shoulders and neck as much as possible.
- Maintain a steady breath as you work strongly with your legs.
- Can you stabilize your pelvis while your legs shift their position?
- Can you feel how both strength and stretch are essential to this pose?
In the fall of 2023, you can find out more about Yoga Practice Guide for Building Strong Bones and Improving Balance by visiting https://www.ellensaltonstall.com/
 Ellen Saltonstall, ERYT-500, C-IAYT, YACEP is an alignment-based yoga instructor and body therapist based in New York City with over 40 years of experience. Her background includes modern dance, a massage therapy practice, Iyengar Yoga and Anusara Yoga. She was certified in Anusara Yoga in 2001, then became a Subject Matter Specialist in anatomy and therapeutics. In addition to yoga, she teaches Bodymind Ballwork, a method of bodywork using rubber balls to facilitate tension release. Her published books include Yoga for Arthritis (2008), Yoga for Osteoporosis (2010), Anatomy and Yoga (2016), and The Bodymind Ballwork Method (2018). She offers yoga therapy webinars through YogaOnlineU.com, and she teaches nationally and internationally with a specialty in anatomy and therapeutics. She is known for her clarity, depth of knowledge, and enthusiasm in encouraging students of all levels to find freedom and joy through yoga. More information here.
• Follow Yoga for Healthy Aging on Facebook and follow Nina on Instagram • Order Yoga for Times of Change here and purchase the companion videos here • Order Yoga for Healthy Aging: A Guide to Lifelong Well-Being here.
Leave A Comment