

by Nina
It’s the time of year when stress starts to build in advance of the holiday season and when running around can make us exhausted and depleted. So I decided this would a good time to share this simple sequence for reducing stress and resting your body and mind from the book Yoga for Healthy Aging. (I’ve modified it slightly by adding some variations to choose, along with a few instructions.)
I originally designed this short, simple sequence to maximize the relaxing effects of supported inverted poses by combining a few into an easy practice. The more time you spend in the supported inverted poses, the deeper your feelings of relaxation will be.
The first three poses in the practice stretch your shoulders and legs to make the supported inversions more comfortable for you. You then ease one pose at a time from partial inversions to two gentle full inversions, becoming more and more quiet as you go.
For those who are tired but physically restless, starting out with more active poses will help you rest more easily in the final pose. If you want more rest after the final pose, you can always add on Savasana.
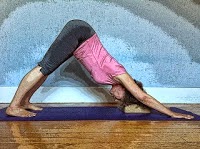
1. Half Downward-Facing Dog pose, 1 minute.

Keep this pose as gentle as possible. If hands flat on the wall is too intense, try just placing your fingertips there instead. If the backs of your legs are stretching too much, you can bend your knees. If your shoulders are stiff, move your hands higher on the wall. See Featured Pose: Half Downward-Facing Dog Pose for information for practicing.
1. Reclined Leg Stretch, 1- 2 minutes per side.

Be careful not to overdo this pose, aiming for a gentle stress not an effortful pose. So let your leg move away from your body if you notice yourself straining. And consciously relax your shoulders, neck, head, and face. If your hread is tipping back in this pose, try a folded blanket under your head but not your neck. See Featured Pose: Reclined Leg Stretch for information about practicing this pose.
3. Downward-Facing Dog pose, any version, 1-2 minutes.


Keep your Downward-Facing Dog pose gentle, bending your knees slightly as shown in the photo to reduce any strain of the pose. If you wish, you can place your hands on the seat of chair. See Featured Pose: Downward-Facing Dog Pose for information on how to practice this pose.
If you know how to do the version where your head is supported and you feel comfortable in that, that’s a good option as well. See All About Supported Inversions for information on practicing with head support.
4. Supported Standing Forward Bend or Supported Standing Wide-Legged Forward Bend, 1-3 minutes.


To make this pose as relaxing as possible, make sure to place a blanket or towel on the seat of the chair. Most people can easily reach the seat of the chair with their arms and then place their forehead on their arms. However, if you cannot, try placing a bolster or stack of blankets to make the support higher. Depending on your body type, one or other of these poses may be more comfortable, so choose whichever you prefer. You can also do both poses, starting with Standing Forward Bend and then doing the Wide-Legged Standing Forward Bend. See Featured Pose: Standing Forward Bend for information on Supported Standing Forward Bend. Featured Pose: Wide-Legged Forward Bend has some information about practicing a supported version, but it shows the head on a blog. I think the chair is much more effective for relaxation.
5. Supported Bridge Pose, with bent or straight legs, 3-5 minutes.


The version with bend legs is much easier to set up and get into. The version with straight legs can be more restful and relaxing—if it doesn’t bother your lower back—but you need to be careful with propping. Make sure your shoulders are touching the ground but your chest is lifted by the bolster. See Featured Pose: Bridge Pose for information on the bent knees version and Featured Sequence: Easy Supported Inverted Poses for information on the straight legs version.
6. Legs Up the Wall pose or Easy Inverted Pose, 5 to 20 minutes.

Make sure you’re comfortable in this pose. In Legs Up the Wall pose, it is important to have some support under your pelvis, but you can use a folded blanket instead of a high bolster. Some people with tighter leg muscles and/or back problems find Legs Up the Wall pose uncomfortable not matter what. Easy Inverted poses is a good alternative for them. It’s also one you can do if you don’t have wall space and you can use furniture, such as a couch or ottoman to support your legs. See Featured Pose: Legs Up the Wall Pose for information about practicing Legs Up the Wall pose and Easy Inverted pose, which is considered a variation of Viparita Karani.
• Follow Yoga for Healthy Aging on Facebook and follow Nina on Instagram • Order Yoga for Times of Change here and purchase the companion videos here • Order Yoga for Healthy Aging: A Guide to Lifelong Well-Being here.
Leave A Comment