
 by Leza Lowitz
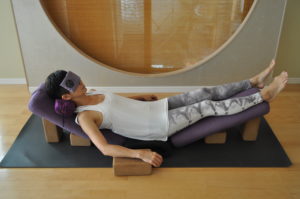
V-Pose is a variation of Empress pose, which I wrote about in my post Featured Restorative Pose: Empress Pose. In this variation, you use a bolster and blocks at an incline for your upper body to relax upon and use another raised bolster at an incline in the opposite direction to support your legs and feet to in a slight inversion. This inversion releases fatigue in the legs, improves circulation, and helps lymph drainage. It also calms the mind and regulates the body’s circadian rhythms. I recommend V-Pose for those who have trouble sleeping or those who have jet lag. And it a good alternative for those who can’t get comfortable in Legs Up the Wall pose, especially the variation where your back is flat on the floor.
I love to do this pose when I have been on my feet all day or if I have been standing for hours on end.
To set up for the pose, you’ll need the following: yoga mat, 2 bolsters, 2-6 blocks, 2 or more blankets, neck pillow, eye pillow, and sandbag. If you don’t have bolsters, you can use pillows or rolled up blankets. You can also use a rolled-up towel instead of a neck pillow. If you don’t have a sandbag, you can use a bag of rice or other grains.
Setting Up
Start by spreading a yoga mat on the floor. Towards the upper half of the mat, place a support—a block or stack of blankets folded into narrow rectangles—to go under your bolster. Now place the bolster or rolled-up pillow vertically on the support so the bolster is at a diagonal, like a slide.
Next, place a folded blanket that is in a square about the size of your hips against the bolster. Then place your second bolster vertically along the mat and support it with a block or a stack of blankets at the desired height, at a diagonal the other direction. The two bolsters should make a V shape with the folded-up blanket between them.
To come into the pose, sit down on the mat in front of the bolster with bent knees, and scoot back so your lower back is right up to the edge of the bolster. Then lie back on the bolster and make sure the support for your head is in the right place. Now lengthen your legs out onto the bottom bolster. If you need to make an adjustment to find the proper position, bend your knees and slide out to adjust the bolsters, then slide back into the pose.
Allow your buttocks to melt into the blanket on the ground and your lower back to rest against the bolster. Let your legs relax onto the inclined bolster. If desired, use a yoga strap to keep the legs together.
Settle into the pose so that you are comfortable and allow your chin to rest toward your chest to activate a relaxation response and dial down off the Reticular Activating System (RAS).
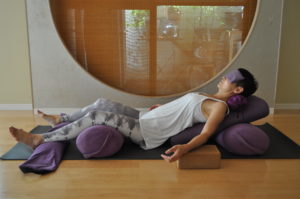
Make sure you are evenly laid out, supported, and comfortable. If your arms and hands don’t rest easily on the ground, you can add a support under them, such blocks or folded blankets or towels. Place the props to the sides of the bolster to support your arms and hands, particularly under your elbows and wrist joints. If desired, cover yourself with a blanket or shawl, cover your eyes with an eye pillow or soft scarf, and allow yourself to relax and be truly supported.
Variations
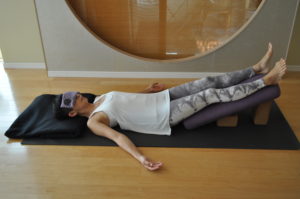
If it is uncomfortable to have a bolster under your torso or you simply wish to try an extra relaxing variation, lie flat on the mat, with a blanket or support under your head and neck, and simply elevate your legs and feet. This variation is a good alternative to Legs Up the Wall pose, inviting a sense of quietude and calm.
Some other ideas include: Rolling up a blanket to make a belt shape to support the hands, placing gentle pressure on the pelvis. You can wrap the hands in a blanket, like a muffler.
If desired, place a light sandbag or bolster on the pelvis.
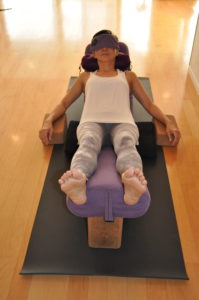
If extra support is desired under the knees, use a bolster or fold up towels to provide it.
Also, some people prefer to have the ankles hooked onto the edge of the bolster and the feet suspended. This provides a lengthening of the spine.
Practicing the Pose
In all variations, sense all the places you feel your body making contact with the props and the ground. Take several slow, deep breaths to release your weight, melting into the supports.
Bring your awareness to your front body. As you inhale, soften your belly, ribs, and chest. As you exhale, melt into the support, releasing.
Notice the sensations in your body and any emotions that arise. Notice without judgement, holding them in loving awareness.
You can also try releasing tension, stress, anxiety, worry and exhaustion on the exhalation and cultivating cultivate peace, self-love, and comfort on the inhalation.
Stay from 5-15 minutes as long as there is no discomfort. When you’re ready to come out, slowly take your time to roll onto your right side and enjoy a few quiet breaths before coming up slowly, head last.
You can read more about Leza’s writing at www.lezalowitz.com and about her yoga studio and classes at www.sunandmoon.jp.
Follow Yoga for Healthy Aging on Facebook ° To order Yoga for Healthy Aging: A Guide to Lifelong Well-Being, go to Amazon, Shambhala, Indie Bound or your local bookstore.
This looks delicious! I can’t wait to try.