
by Bridget
Because our eyes are on the front of our heads, most things we do tend to take place in front of us. Over the years, the muscles in our front body can start to shorten as the muscles in the back body are neglected, resulting in an imbalance that can lead to a forward head position, slumped shoulders, and, in extreme cases
that usually also involve osteoporosis, vertebral compression fractures. The more focus we have on keeping our natural curves of the spine and on maintaining a balance between front and back body strength, the fewer the complications that can arise as we age.
Locust pose (Salabhasana) is such a great pose for maintaining or building strength in the back body, and because there are so many variations, it can meet you where you are. Not only is it a good strengthening pose for the back body, the legs and shoulders also work here. And because “core” strength requires strengthening from all directions (not just abdominal work) Locust pose strengthens the core from the back, including muscles such as the erector spinae, running along the sides of the spine, and the quadratus lumborum (QL), connecting the bottom of the ribcage to the top ridge of the pelvis, and (like in the front body your rectus abdominus pull the front bottom ridge of your ribcage toward your pubic bone – a crunch) the QLs pull the back bottom ribcage and pelvic rim together, like a reverse crunch.
Variations of Locust Pose
1. Upper Body Only. This is my favorite one. Locust pose puts you face-down, which can get a little claustrophobic, but this version of it tilts you up and lets you examine the horizon instead while still working your back and arms. This version is good if you have a less flexible backbend or have pain lifting your upper body, whether this is due to weakness or injury. And taking some of the weight out of the pose allows you to work your muscles more gently as you open your chest more fully. (Because the bolster sits squarely in the space between your bottom ribcage and the tops of the hip bones, this one is not recommended for during pregnancy, or for anyone experiencing abdominal pain or discomfort.)
In this variation, keep your legs on the floor but engage your leg muscles so your legs can stabilize you. As you lift your arms behind you and curve your spine evenly to lift, keep your shoulders soft.
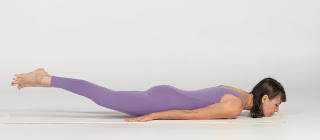
 2. Legs Only. This version allows you to give full attention to lifting your legs, strengthening the buttocks and the lower torso. Your head, torso, and arms remain on the floor throughout. Turning your palms toward the floor will give you a little more stability. Begin the pose by finding length in your body, especially in the legs, then ground your pelvis by squeezing your buttocks to press the pubic bone down. Then see if you can lift your thighs off of the floor (aiming for this goal only–no need to accomplish it when you’re just getting started.) This version can be challenging, especially if you are experiencing pain in your lower back. If this is the case, check out the next variation.
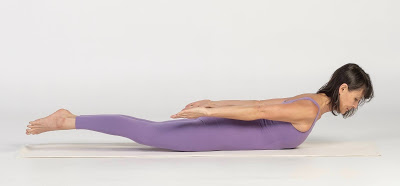
3. One Leg Only. This version is a more gentle approach to the Legs Only variation. It brings back the upper body work but lets the entire back support the lift of only one leg. Your arms remain on the floor, with palms down, and one leg also remains down. But in this version you lift your head and chest, providing more even strengthening of the whole back body. As you practice, keep your pelvis even, pressing both front hip points into the floor, and keep your buttocks engaged, squeezing in to press the pubic bone into the floor. Keep your lower back elongated, recruiting the muscles higher up in your back body to lift your chest. 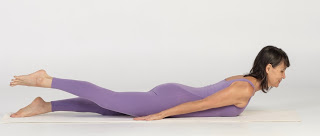 The photo demonstrates a lifted torso, but you could also try this with arms, chest and head down.
Another version of this pose, which I find simultaneously more supportive and more challenging, is with a rolled blanket under the mid-thighs. In this version, your legs are already supported in the first lift off the ground, but the work is to lift them off of the blanket. This can be done one leg at a time or both together.
4. Arms to the Sides. With your arms straight out to the sides, like an airplane, there is more weight in your upper body, making this more challenging for the back body. Generally it’s a good idea to start out in the classic version of the pose, then move the arms to the sides. I’m including two propped versions of the pose below.
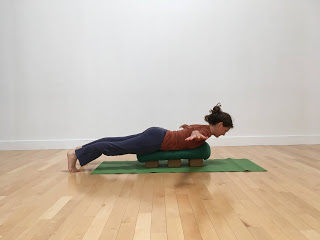
If you have the strength to extend your arms to the sides but have a shoulder injury that makes lifting the arms off the floor in that position difficult, you can try this version that uses two blocks to support your pubic bone and lower ribcage. If you’re shorter, the blocks can be right next to each other, but just be sure that the bottom block supports your pubic bone (not your thighs) and the upper block supports just the very bottom of your lower ribcage. (I put a blanket on top of the blocks for padding.) Once you have both supported, the lift will feel easy.
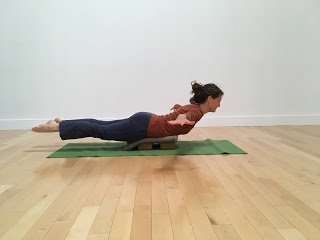 The last version of Arms to the Sides is a therapeutic option, with more of a focus on your upper body. To lift the bolster, place it on 3 blocks that are evenly spaced beneath it. This will provide plenty of space for your arms to move, lifting away from the soft bolster is gentle, and your face is distanced from the floor. Same as in the other poses, find the grounding in your pelvis, lengthen, and then lift. (In the photo, I have my toes tucked under, letting my legs support me, but you could also point your toes and lift your thighs.)
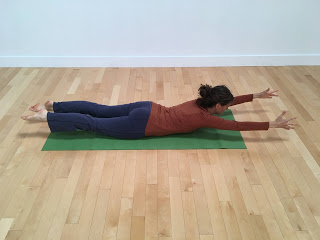
5. Arms Forward. If arms to the sides feels manageable, you can continue moving your arms forward, extending them overhead, like you’re Superman flying through the air. Keep in mind that this adds more weight to the pose than you might expect. Don’t push it if you’re just starting to build strength here or if you’re nurturing an injury.
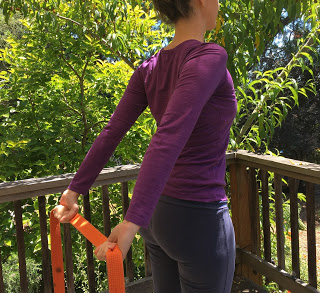
6. Standing Version. In this version, you can get the strengthening of your arms and also work your back body without gravity weighing you down. Starting in Mountain pose, take a strap behind your body and hold it between your hands. Your grip on the strap can alternate to work different parts of the arm, but to mimic the classic Locust pose shape, turn your palms backward before gripping the strap. Pull out on the strap, lengthen your arms, and open your chest by spreading your collar bones and lifting your breastbone. Notice the muscles in your back body working to help with this action. Then lift the strap behind you, engaging the backs of your armpits.
Working in the Poses
I recommend having some padding under your front body—a folded blanket perhaps—to pad your pubic bone, front hip bones, and lower ribcage. Lie down and get comfortable, seeing if you can rest with your forehead either on the floor or on a small lift (maybe a folded washcloth). Let your whole back body relax and melt down toward the floor. From there, tuck your toes under behind you, and as you press your heels back past your toes, your knees will lift from the floor. Press your leg muscles in toward the bone, then squeeze your buttocks in toward each other. This will help you to press your pubic bone into the floor, lengthening your low back. From there, imagine that there’s an electric current traveling from your tailbone out through the top of your head, and let it fuse your spine in that long shape so that when you lift your chest from the floor, it’s coming up as one unit, not peeling off one vertebra at a time. You can use the strength of your legs and your toes pressing into the floor to help with this lift. Now lengthen your arms back and let them lift away from the floor, pressing your palms up toward the ceiling as you engage the backs of your armpits. Press your breastbone forward, between your arms, and then, with this long, strong body, start to curl up toward the sky, but let all parts of your body, from the base of the skull all the way to the back of the heel, bend equally. Finally, point your toes as lift your thighs away from the floor.
Nina has more about timing and repetitions in her post Techniques for Strength Building with Yoga if you want to read more on this topic.
Find information on Bridget’s current classes here.
Follow Yoga for Healthy Aging on Facebook ° To order Yoga for Healthy Aging: A Guide to Lifelong Well-Being, go to Amazon, Shambhala, Indie Bound or your local bookstore.
Thank you Bridget! I love all the floor poses for my Hatha classes but have been challenged finding a way for my chair yoga students to work and strengthen the back. Perfect solution!