
by Leslie Howard
Having practiced yoga for most of my life, I have heard countless mentions of how to gather my tail and put it under me. Tuck it, scoop it, pull it forward, lengthen it toward the ground—the instructions are infinite.
Then I took a workshop with Judith Lasater. I was happily tucking away in Tadasana (Mountain pose) when she called me out. “Push your femurs back and release your tailbone,” she said. “Release your tailbone!”
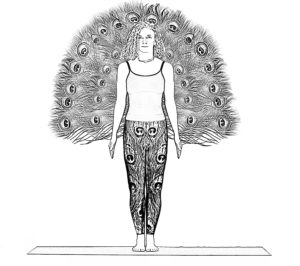
After a few awkward tries, I succeeded. I felt my butt popping out and imagined that it must look like I had a peacock feather tail. “That much out?” I thought. It was an eye-opening moment. I could actually breathe better. In retrospect, that was the beginning of my tailbone’s liberation.
Pulling your tailbone forward (flexing the coccyx, especially when you don’t need to, shortens the pelvic floor muscles, putting the pelvic organs at a disadvantage. Loss of the anterior tilt means the organs can’t use the pubic arch as a shelf and may become prone to prolapse. When we tuck our tailbones unnecessarily, it overloads the lumbar discs and hampers the spine’s ability to work as a shock absorber. We need adequate room between our discs to ensure that the nerves that flow from the spinal column and spinal cord have enough space and don’t become entrapped, impinged, or otherwise cause pain.
Ideally, our spine has three natural curves: the lumbar or lower back curve, which is concave; the mid-back or thoracic curve, which is more convex; and the curve of our neck or cervical curve, which is concave again. Any misalignment in one of the curves will force the others to react in kind. And as the spine grows out of the pelvis, the position of your pelvis naturally affects the curves of the spine.
I believe the instruction to tuck your tail is intended to take the pelvis in a posterior direction (behind you), which is necessary in backbends and many standing poses. The problem is that literally tucking the tail is not the right approach to getting the whole pelvis to move posteriorly. Inappropriate tucking of the tailbone can carry a number of serious risks. Some people will do a small, localized action at the tip of the tailbone near the anus, but that action will not help keep compression out of your lumbar discs while doing backbends. Instead, take the top of the buttocks away from your lumbar, and draw the front hip points toward the rib cage to keep compression out of the lumbar spine.
Now, some of you are saying, “I am not a tucker. In fact, I have been told by yoga teachers that I have a swayback!” Swayback, or a hyperlordotic back, means too much lumbar curve. Women of-ten tell me that their various instructors (yoga, personal training, ballet) have encouraged them to tuck more to compensate for overarching their lumbar.
Yes, swayback can create serious stress in the area where the pelvis and spine meet (the lumbosacral joint) and on the hip joint. But tucking is not the solution. Strengthening the pelvic floor muscles can often improve a swayback. It is important to develop awareness of where your neutral pelvis is (everyone’s will be slightly different), which allows the curves of the spine to communicate with each other in an optimal way.
Hyperlordosis is a concern, but it is common for a swayback to be misidentified. There are other, perfectly normal reasons for what may look like hyperlordosis. For example, some women are simply blessed with naturally round buttocks that may give the impression in profile of an extreme curve in the spine. Others have mastered the art of “mothertucking” the pelvis but then they throw their front ribs forward, which also looks like a swayback. I call these people rib-poker-outers or RPOs. When given the instruction to lift the chest, RPOs will often throw their front ribs too far forward, creating shear pressure on the spine.
Now there are students who have swayback because of too much anterior tilt of the pelvis. What’s happening in those cases is that the anterior superior iliac spine (frontal hip points) is tipped forward of the pubic bone, thus creating a hyperlordosis of the lumbar spine. This can happen because of tight hip flexors, front thigh muscles (quadriceps), or lower back erectors paired with weak or inhibited abdominal muscles. There are yoga poses that can help. King Dancer pose is a particularly good one.
King Dancer Pose (Natarajasana Variation)
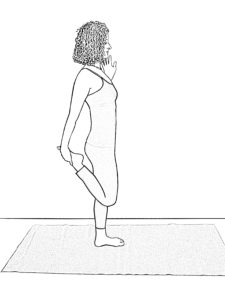
This pose will help to stretch front thigh muscles (quadriceps), psoas muscles (the muscles that connect your spine to your thigh bones), and the groin area. The mistake I see many students make with this pose is they lean forward and pull the bent leg back too much. The key to deepening the stretch is to keep the pelvis in a more posterior/ tucked position.
How to Practice
- Begin in Mountain pose with your feet together and arms at your sides.
- Shift your weight onto your left foot, then bend your right knee and bring your right heel toward the outer edge of your right buttock.
- Reach your right hand down and hold the top of your right foot. You can also loop a strap around the top of your right foot and hold onto the strap with your right hand.
- Draw your inner knees toward each other.
- Reach your left arm overhead or, if you need to steady yourself, place your left hand on a wall.
- Slightly bend your left knee, keeping the left kneecap facing forward. This action allows you to draw the flesh of the buttocks away from your lumbar spine. Feel the stretch in the right groin and front thigh muscles.
- Lengthen the front of your right leg as if you were trying to put your right kneecap on the ground. This will create space in the right hip socket. Do not yank on the foot and send the leg backward. The traction of the hip and elongation in the thigh muscles is more important than taking the thigh back.
- As you press your raised foot into your hand, keep your chest lifted. Do
not let your torso drop forward. Keep your pelvis square and your right knee toward the midline of your body. - If you are holding a strap, walk your hand down the strap toward your foot until you can clasp the top of your foot with your right hand.
- Hold for 1 to 3 minutes. To come out, release the right foot and return to Mountain pose.
- Repeat the pose on the opposite side for the same amount of time.
For more information on the pelvic floor and yoga poses that can help, see my book Pelvic Liberation at www.lesliehowardyoga.com or Amazon.com.
Leslie Howard is an Oakland-based yoga teacher, specializing in all things pelvic. She leads workshops and trainings nationally and has written a book about caring for the female pelvis, Pelvic Liberation. She is a regular presenter for the Yoga Journal conferences and a regular contributor to Yoga Journal magazine. Her own struggles with healing her hips and pelvis led her to intense study of the anatomy, physiology, cultural messaging, history, and energetics of this rich area of the body. Her teaching is informed by over 3500 hours of yoga study with senior Iyengar yoga teachers. She considers Ramanand Patel her most important influence and mentor. She has designed two very successful studies for UCSF on how to use yoga to alleviate incontinence and pelvic pain.
• Follow Yoga for Healthy Aging on Facebook and follow Nina on Instagram • Order Yoga for Times of Change here and purchase the companion videos here • Order Yoga for Healthy Aging: A Guide to Lifelong Well-Being here.
Just when you started the paragraph “Now, some of you are saying, ‘I am not a tucker…'”, that’s exactly what I was thinking! :)
As a yoga teacher myself, I understand why tucking the tail doesn’t make sense. In my own body, I have pronounced lordosis (yes, in part due to a generous booty), but as you suggested, I think the main culprit is tight hip flexors. I will try to work in more Dancer’s Pose!