
by Nina
In Baxter’s post on wrist care (see “Wistful Wrists: How to Keep Your Wrists Safe”), he recommended a wrist “flossing” sequence developed by Tom Alden that was featured in Timothy McCall’s book Yoga As Medicine. This is a wonderful sequence you can do if you over-worked your wrists doing yoga, have wrist problems, such as carpal tunnel syndrome, or just want to give your hands and wrists a break during a marathon typing session. There are three different “flossing” movements:
1. Palms Down. Start by interlacing your fingers and turning your palms to face the ground. Move your elbows out the sides, so both arms are parallel to the floor. Gently pull your wrists apart, so you feel a slight traction, then raise your right arm and lower your left, bringing your right wrist into a forward bend and your left wrist into a backbend. Allow your right arm to do all the work, while your left arm is passive.
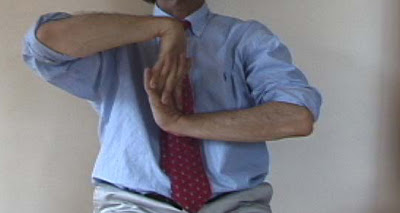
Repeat the movement on the other side by using your left arm to do all the work while your right arm is passive. Go back and forth any number of times.
2. Palms Facing You. Start by interlacing your fingers and turning your palms in to face the ground. Move your elbows out the sides, so both arms are parallel to the floor. Now turn your palms inward, to face you. Gently pull your wrists apart, so you feel a slight traction, then move your right arm outward and your left inward, bringing your right wrist into a forward bend and your left wrist into a backbend. Allow your right arm to do all the work, while your left arm is passive.

Repeat the movement on the other side by using your left arm to do all the work while your right arm is passive. Go back and forth any number of times.
3. Palms Facing Away. Start by interlacing your fingers and turning your palms to face the ground. Move your elbows out the sides, so both arms are parallel to the floor. Now turn your palms outward, so they face away from you. Gently pull your wrists apart, so you feel a slight traction, then move your right arm inward and your left outward, bringing your right wrist into a forward bend and your left wrist into a backbend. Allow your right arm to do all the work, while your left arm is passive.

Repeat the movement on the other side by using your left arm to do all the work while your right arm is passive. Go back and forth any number of times.
See http://www.tomalden.com/ for information about Tom Alden. For information about Timothy McCall and his book Yoga As Medicine, see http://www.drmccall.com/.
Follow Yoga for Healthy Aging on Facebook ° To order Yoga for Healthy Aging: A Guide to Lifelong Well-Being, go to Amazon, Shambhala, Indie Bound or your local bookstore.
I did this wrist flossing with my chair yoga class today. They loved it! There were 18 people present and over half have wrist/hand problems.
One woman is new to the group; today was her third class with me. She told me after class that she has been dreading carpal tunnel surgery but one hand was getting very bad. She had come into class today with the hand tingling. After going through the wrist flossing, she said it felt so much better. Only the thumb was still feeling a little tingly but the rest of the hand felt normal. She was very excited and plans to do these movements every day.
Another student is a professional organist who has been having wrist problems. She also said the flossing made her hands feel very good.
Thanks so much for taking the time report back to us! That's very exciting news–I can tell you, you totally made my day. And your students are lucky to have a teacher like you who continues to learn and try new things.
–Nina
This comment has been removed by the author.
Thank you for another wonderful post! My "Third Age" yoga students will be eternally grateful for this. Also, I'm working privately with a 62-year-old pianist whose wrists have weakened because of a sedentary lifestyle, and this will be a godsend to him, too. Thank you again!
Thank you for taking the time to comment! –Nina