
by Nina
Remember my post Too Much Yoga? Or Just the Wrong Kind? about hyper-mobile people and how they should focus on strength rather than stretching in their asana practice? One reason I know about this issue is that one of my good friends has also has the thin, hyper- mobile body type, which is super flexible but tends to lack strength. And at this point, she has arthritis in both knees, so strength building in her lower body to support those joints is more important than ever for her!
So I decided to design a lower body strength building sequence for her, which I’ll be teaching her in person. But because we only have one lower body strength sequence on the blog (and I’ve heard from you that you enjoy posts with sequences), I thought I’d share this one with you. Let me know what you think about it!
What’s different about this sequence than the one Baxter designed in Featured Sequence: Lower Body Strength is I needed to avoid poses that wouldn’t work for arthritic knees—or at least hers. I also avoided poses with too much weight on the hands due to thumb arthritis. (I checked ahead with her about certain poses to see if she was okay doing them or not.) Also, well, it’s just different!
LOWER BODY STRENGTH SEQUENCE
This turned out to be rather long sequence. To shorten it, simply skip any of the poses after the initial warm-up of Half Downward-Facing Dog at the Wall but finish up with the two cool-down poses.
1. Half Downward-Facing Dog Pose, with a block between your thighs, 1 minute.
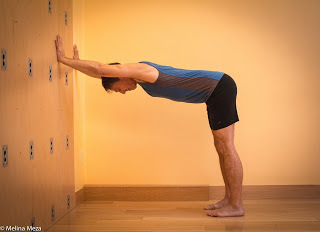
See Featured Pose: Half Downward-Facing Dog Pose for instructions on the basic the pose. Before walking your feet back, place the block, on it’s narrowest width, between your thighs and then walk back slowly and carefully (you can do it!). While you’re in the pose, firm your inner thighs against the block.
2. Warrior 3 at the Wall, 30 seconds or more per side.

See Warrior 3 (Wall Version) for instructions. If putting that much weight on one leg hurts, try bringing your hands further up the wall and dropping your leg at a bit, so you’re at more of a diagonal. Focus on activating both legs in this pose (Baxter needs to activate his back thigh a bit more—try firming the hamstring).
3. Downward-Facing Dog Pose, versions 3 or 4 (forearm versions), 30 seconds or more.

See Featured Pose: Downward-Facing Dog Pose for instructions. Focus on activating your legs. Add a block between them if you like.
4. Child’s Pose, version 3 (knee support), or Puppy Pose if that’s better of you, 1 or more minutes.


See Featured Pose: Child’s Pose for information on Child’s pose or Downward-Facing Dog Pose Variations, Version 1, for instructions.
5. Downward-Facing Dog Pose, versions 3 or 4 (forearm version), with leg raises, 20 seconds or more per side.
 |
| Like This But With Forearms on the Ground |
From forearm version of Downward-Facing Dog Pose, as if you were practicing Warrior 3 at the wall, take one leg up behind you and then repeat on the other side. Focus on activating both legs (beautiful job in this pose, Joy!).
6 Child’s Pose, version 3 (knee support), or Puppy Pose if that’s better of you, 1 or more minutes.
See Featured Pose: Child’s Pose for information on Child’s pose or Downward-Facing Dog Pose Variations, Version 1, for instructions.
7. Plank Pose, version 2 (forearm version), as long as you can comfortably hold it.
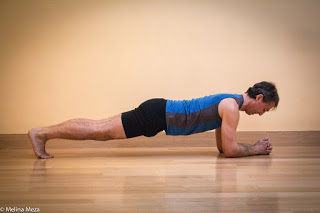
See Featured Pose: Plank Pose for instructions. Work on building up your endurance in this pose over time. Keep both legs active and lifting up away from the floor.
8. Mountain Pose, version 2 ( block between thighs), 1 minute.

See Featured Pose: Mountain Pose for instructions.
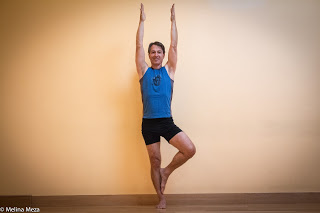
9. Powerful Pose, version 2 (block between thighs), 30 or more seconds.

See Featured Pose: Powerful Pose for instructions. Be sure to firm your thighs against the block
10. Warrior 2 Pose, classic version, bending front knee only as far as feels okay, 30 or more seconds per side.

See Featured Pose: Warrior 2 Pose for instructions. Be sure to keep both legs active in this pose (pay attention to that back leg!).
11. Tree Pose, any version that’s comfortable, 30 or more seconds per side.
See Featured Pose: Tree Pose for instructions. Firm the muscles of the standing leg.
12. Supported Backbend, any version, 1 to 3 minutes.
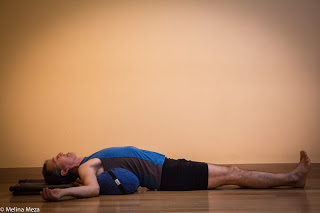
See Featured Pose: Supported Backbend for instructions. Keep your legs active as you relax your upper body.
13. Locust Pose, either classic version or versions 3 or 4 (just legs).

See Featured Pose: Locust Pose for instructions. Be sure to firm your hamstrings (backs of your thighs) to help lift your legs.
14. Dynamic Bridge Pose, 6 or more times.

See Viideo of the Week: Dynamic Bridge Pose for instructions. Be sure to firm your hamstrings (backs of your thighs) to help lift your legs.
15. Bridge Pose, classic version, 1 to 3 minutes.

See Featured Pose: Bridge Pose for instructions. Be sure to firm your hamstrings (backs of your thighs) to help lift your legs.
16. Constructive Rest Pose, 3 or more minutes.
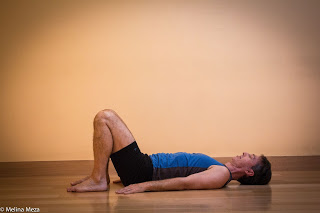
See Featured Pose: Relaxation Pose for instructions. Relax your legs (yay!) and let your knees fall toward each other. Tie a strap around them, just above the knees, if you like.
17. Legs Up the Wall Pose, any version, 5 or more minutes.
![]()
See Featured Pose: Legs Up the Wall Pose for instructions. Position yourself so you do not feel any stretch in your legs. If your back feels tender when you are ready to do this pose, try it with no props at all, with your back flat on a the mat or a thin blanket. Keep your legs only lightly active. Tie a strap around them, just above the knees (toward your head), if you like.
Follow Yoga for Healthy Aging on Facebook ° To order Yoga for Healthy Aging: A Guide to Lifelong Well-Being, go to Amazon, Shambhala, Indie Bound or your local bookstore.
I have arthritis in my knees and I tried this sequence today. Very nice! I even stayed in the supported backbend for 5 minutes because it felt so good.
However, would there be any reason not to move the standing poses in the middle up to a position right after the warrior 3 at the wall? I would prefer to do all the standing poses first and then go down to the floor. It is hard to get up from the floor and I like to minimize the times I have to do that.
Also, by the end my body was craving a twist so I added a few. Other than that, it is a lovely sequence and I will use it again.
How wonderful that this worked well for you! Yes, of course, you could move the standing poses. I put the standing poses after the Downward-Facing Dog and Plank poses because the wall poses were good warm-ups for those more challenging poses. But if you're comfortable doing those after the standing poses, go for it! Also, good move to listen to your body and add the twist that you were craving.