
by Baxter and Nina

As part of our continuing mission to make Downward-Facing Dog accessible to almost everyone, today we’re featuring the kneeling variation of the pose that is sometimes called Puppy pose. For those of you who cannot do full Downward-Facing Dog pose due to hand or wrist problems or general weakness, this modification is a wonderful alternative. Because your knees are on the floor, you bear very little weight on your hands in this pose. And because your shoulders are lower to the ground, the position of your wrist stays closer to neutral. (When your hands are directly under your shoulders, as in Cat-Cow pose, your wrists are deeply bent; however, in Puppy pose, your hands and arms are more in line with your wrists.)
Even though you’re bearing very little weight on your hands in this pose, because you keep your arms and shoulders active, this pose still helps build upper body strength while also increasing flexibility in the shoulders. Puppy pose activates the triceps muscles in the backs of your arms and the stabilizing muscles of your shoulder blades. As a side effect, if you keep your spine neutral, you also strengthen your front abdominal muscles (and who doesn’t love that).
For upper body strengthening, you can practice this pose on its own as an alternative to full Downward-Facing Dog, or you can use Puppy pose to warm up for practicing the full pose, especially if you are tight in the shoulders.
Instructions: Although we haven’t included the prop in our photo (our bad!), we do recommend that you start by placing a folded blanket on your mat to protect your knees before you come onto your hands and knees. Now come onto a hands and knees position (like Cat pose), with your knees on the folded blanket and your palms on your mat (or the floor). If your wrists hurt in this position, stay on your fingertips.
From hands and knees position, keeping your hips over your knees, slide one hand at a time as far forward as is comfortable. Keep your hands shoulder-width apart and even with each other. At this point, you may be able to get more length between your hands and sitting bones by sliding your sitting bones back away from your hands. If you have tight shoulders, be aware of the tendency for your front lower ribs to drop or your lower back to arch dramatically to compensate. So focus on maintaining your torso in Mountain pose (Tadasana) alignment.
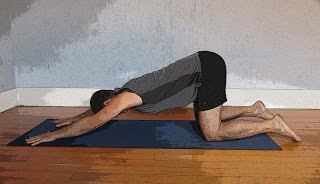
Once you have aligned yourself in the pose, press your palms firmly into the ground. Then reach your hands down and forward as you create an opposite movement of your sitting bones away from your hands to get a maximum length and stretch in the pose.
Stay in the pose for six to eight breaths, gradually working your way up to one minute. To come out of the pose, you can either swing your shoulders forward and then walk your hands back or simply walk your hands back to your knees.
Cautions: If you have rotator cuff injury or a history of shoulder dislocation, keep your chest lifting away from the floor rather than pressing down toward the floor. Back off if you feel any pain. If you have lower back problems, make sure you keep your lower back neutral (not overly arched) as you enter, maintain and exit from the pose. If you have knee problems, you might need extra padding. Or, you might need to choose a different variation of Downward-Facing Dog pose (see Downward-Facing Dog Variations).
Follow Yoga for Healthy Aging on Facebook ° To order Yoga for Healthy Aging: A Guide to Lifelong Well-Being, go to Amazon, Shambhala, Indie Bound or your local bookstore.
Leave A Comment