
by Baxter and Nina
![]()
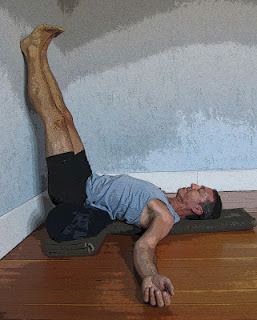
Viparita Karani, which is often called Legs Up the Wall pose (a more accurate name is Inverted Lake pose), is one of our very favorite poses. Because this pose is a supported inversion, it triggers the relaxation response (see The Relaxation Response and Yoga). It is also comfortable for most people, and the support of the wall allows you to stay in the pose for a good long while, making it a perfect pose for stress reduction or pacifying an over-active nervous system. In fact, this is Nina’s go-to pose for challenging times. It can be practiced on it its own, as part of restorative or supported inversion sequence, or as an emotional counter-pose at the end of any other kind of sequence.This pose also stretches your leg muscles using gravity, so it’s a wonderful antidote to taking a long hike and, if you’re struggling with tight hamstrings, it’s a great way to passively let your leg muscles lengthen without engaging the front leg muscles. And it is a perfect solution for swollen feet and/or ankles (a not uncommon occurrence in summer time or for those on their feet all day long).
We’re showing two different types of propping for the pose: a bolster under the pelvis and a folded blanket under the pelvis. Using the bolster lifts your pelvis higher, creating more of an inversion and thereby making it more effective for stress reduction. However, some people find the bolster irritates their lower backs. In this case, it’s best to use a folded blanket under your pelvis instead. And, of course, not everyone has a bolster so you may need to use blankets for that reason (see Making Your Own Yoga Props). If both versions are irritating to you for any reason, you can try scooting your hips gradually a bit further away from the wall, in order to find your personal sweet spot. If you move too far out, you run the risk of hyper-extending your knees and getting some knee discomfort. So stay mindful of this as you tinker to get it just right. And if you can’t find a sweet spot, you can try the pose flat on your back, without a prop under your pelvis.
If none of these versions make you happy—some people with tight hamstrings just can’t get comfortable—try the version with your legs bent and resting on a chair (see Easy Inverted Pose).
If your legs fall asleep while you’re in the pose (that doesn’t usually happen until after at least 10 minutes, try slightly bending your knees for a minute or so. If you then restraighten your knees, you may find the tingling feeling stays away for a while. Alternatively, it may be a sign that it is time for you to come out of the pose.
Baxter prescribes this pose for:
• leg fatigue
• peripheral edema (swelling of feet and legs)
• low back pain
• foot pain
• recovery from ankle sprains or plantar fasciitis
• stress management
• soothing yourself when you are anxious or agitated
Instructions:
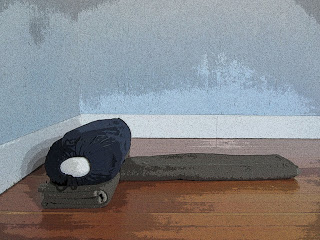
1. Setting Up Your Props. Although we don’t show it, if the room is not carpeted, you might want to set up a yoga mat with the short end at the wall, to provide a little cushioning for your body. Then, depending on the height you want under your pelvis, place just your bolster, a stack of one or two blankets folded into rectangles, or a bolster on top of a folded blanket parallel to the wall but at least six inches away from the wall. It is important to place the prop at least six inches away from the wall and not next to it, otherwise, you will slide off the prop when you go into the pose! Then, if you want a blanket under your head and spine, place a single blanket folded into a rectangle perpendicular to the bolster.
![]()
2. Getting Up into the Pose. For some reason, this is a little tricky for beginners, but once you get used to it, going in and out of this pose becomes second nature. Start by sitting at one end of the prop, with your side to the wall, and your hips touching the wall. Then, placing your hands on the floor or bolster to steady yourself, swing your legs up onto the wall and lie back on the floor.
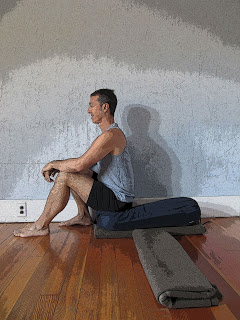
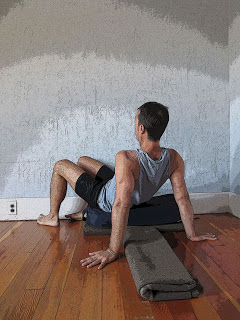
At this point, you may need to scoot your buttocks a bit toward the wall, so hold onto the bolster as you do so to keep it from moving. Ideally, your tailbone should be hanging just off the bolster so your lower back is nicely curved, but if this is uncomfortable for you, try scooting your pelvis back until you find your sweet spot.
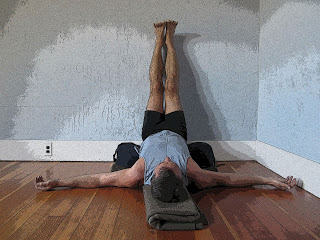
From here, place your arms alongside your body, out to the sides or in a cactus position (like a sleeping baby).![]()
3. Being In the Pose. As you relax in the pose with your eyes closed, either keep your legs together and lightly active or, if your heels don’t slip down the wall when you do so, try relaxing your legs, allowing them to turn out a bit. Experiment to see which version is more comfortable for you. Alternatively, you can tie a strap around your thighs, just above the knees, to keep your legs together without effort. If you have an eye pillow or silk scarf, that can help enhance your relaxation. To feel the full effects of the pose, stay for at least 10 minutes (Nina often stays for 15 to 20 minutes), though, of course, shorter periods are also beneficial.
4. Coming Out of the Pose. When you are ready to come out, bend your knees and place the soles of your feet on the wall. Then, either use your feet to push yourself away from the wall and off the prop (and then slowly roll over onto your side before coming up to sitting) or slowly roll off the prop onto your side. On your side, take a couple of deep breaths, and then use your hands to slowly come up to a seated position (moving quickly will stimulate your nervous system).
Cautions: For those with low back pain, make sure to set up your props so you are entirely comfortable. If that means coming out of the pose and rearranging your props, go ahead and do it. This pose should not be painful; if it is, come out and do the bent leg version, which we call Easy Inverted pose.
If you have uncontrolled high blood pressure, do Easy Inverted pose instead. If your blood pressure is controlled, you can give the full pose a try. However, if Legs Up the Wall does not feel good for you, err on the side of caution and practice Easy Inverted pose instead.
Follow Yoga for Healthy Aging on Facebook ° To order Yoga for Healthy Aging: A Guide to Lifelong Well-Being, go to Amazon, Shambhala, Indie Bound or your local bookstore.
Hi…I've ben teaching Viparita Karani for 20 years BUT I don't each 'legs up the wall' at all, some people think the feeling in the lower back is ' a good stretch' but it's usually just strain. Over the bolster the buttocks should descend into the gap, so the front of the pelvis is horizontal (parallel to the floor) , then the abdomen can descend, it feels almost liquid-like. That's when the benefits of Viparita Karani come. If the lumbar is not ready to curve over the bolster then more standing poses are required to increase flexion in this area. Hope that helps!